Sweet Potato and Chickpea Soup


Because maturity is overrated.

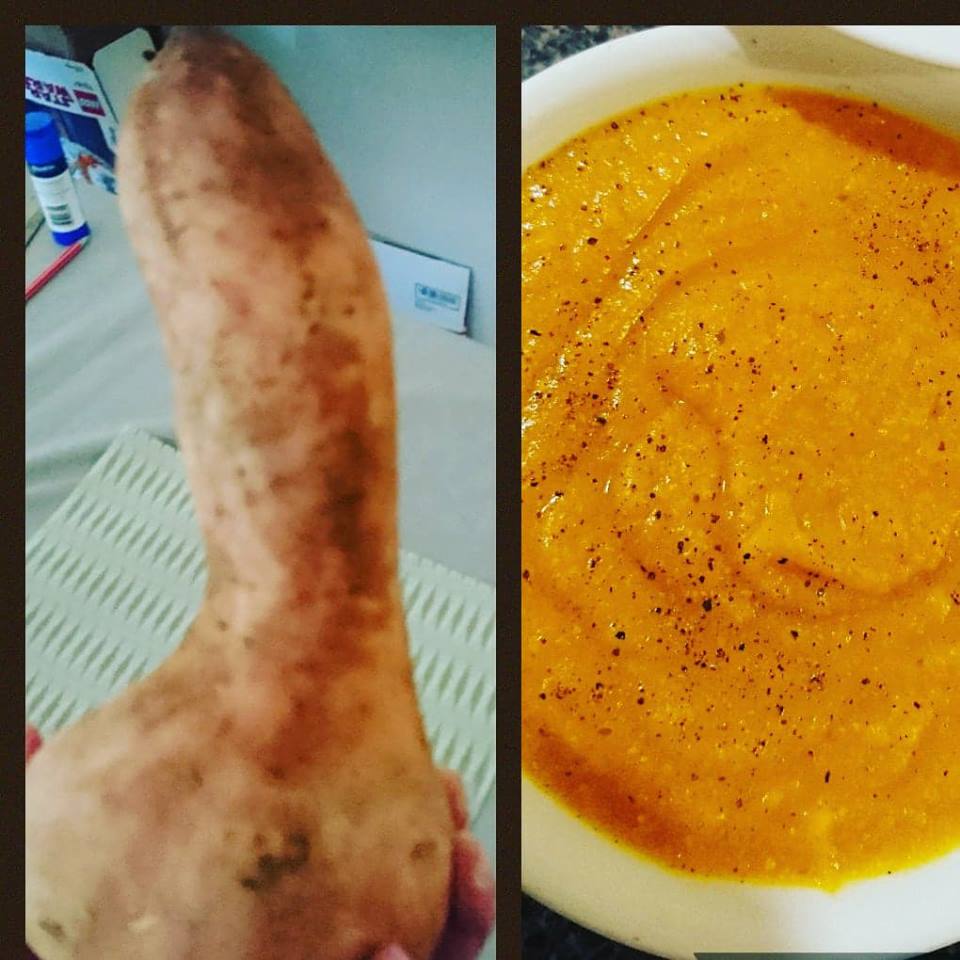
I am a big fan of menu planning. I plan my shopping list on a way-too-complicated-for-what-it-is Google Sheets doc that is shared with hubby, and update it as necessary throughout the week, then follow it like it’s the Bible as I weave through the shopping aisles. If it’s not on the list, it isn’t very likely to get in the trolley. However, despite the fact that I didn’t even need a sweet potato when I went grocery shopping over the weekend, I essentially possess the sense of humour of a 12 year old boy, and I simply wasn’t leaving the store without the glorious specimen in the photo.

So of course, then I had to consider what I should do with it.

When in doubt, I always turn to soup. It’s cheap, delicious, healthy and easy. And only 201 calories per serve. All the good things. Soup is my favourite part if Winter, hands down.

After hubby and I giggled sufficiently at this glorious vegetable, I got to work. And hey, the husband and I have been married long enough that chopping it felt strangely cathartic.

Serves 6
Ingredients

400g can chickpeas, drained

2-3 second spray oil

1 medium brown onion

2 cloves garlic

2tsp minced ginger

1tsp dried coriander

2tsp ground cumin

1/2 tsp chilli flakes

800g sweet potato

300g carrots

6 cups chicken stock


Method

  1. Heat oil in a large saucepan over low heat. Add onion and garlic and cook, stirring occasionally, for 5 minutes, or until sweating and softening.
  2. Stir in coriander, cumin and chilli powder, and cook, stirring, for 1 minuted until fragrant.
  3. Add vegetables and cook, stirring often, for 5 minutes.
  4. Add stock and bring to the boil. Reduce heat and simmer for 20 minutes, or until vegetables are very soft.
  5. Add chickpeas and cover saucepan. Simmer for 10 minutes or until they have softened.
  6. Remove from heat and lend soup until smooth. You could also leave pebbly traces of chickpeas if you’d prefer.  Season with plenty of black pepper.


Facebooktwitterredditpinterestlinkedinmail

Black Pudding Hash

I may be in my thirties, but I want to be Nigella Lawson when I grow up. I am particularly fond of her unique brand of pretentious unpretentious-ness, her confidence in admitting her laziness in the kitchen (you know what, I don’t want to stress in my happy place, either!), a fear of sounding too bossy (I like that, as I always tweak recipes), and preference for accessible and affordable ingredients and methods. Basically, she speaks to me as a busy person who cooks as a hobby, but who really sometimes just can’t be bothered.

And then there are weekends like this one, where I just want to cook all.the.things. I unsuccessfully attempted to satiate my cooking-craving by simply reading cookbooks, and I was astounded to realise that I hadn’t cooked a thing from my copy of Nigella’s At My Table. Criminal, really. So when I found the recipe for Black Pudding Hash with  Fried Egg, well, I knew what my Sunday morning would look like.

But it had to start with a run. Between the potatoes in the hash and the oats in the pudding, this sucker is all carbs and at least as twice as many calories than I’d usually consume at breakfast, but it’s filling as could be, and you know what, sometimes you need to feed the soul as much as the body. I found it works itself out in the long run, as a light lunch is in order after such a heavy breakfast, anyway.

As always, I changed things up to make the recipe work for me. It’s very similar, but I just couldn’t see the need for doubling the oil or black pudding that I usedI love Nigella, but I will never understand how she eats the way she claims, and still manages to look as she does! I also was concerned that it might be a little dry, so I threw in a punnet of halved cherry tomatoes towards the end, allowing them to collapse and created a bit of a sauce that was simply divine. The addition of sweet potato was purely because I have too many in my cupboard right now, but it did make for a prettier dish.

As it stands here, my version comes in at a slightly indulgent 484 calories. If you’re not so worried about the calories, I would bet the farm that a piece of olive-oil-smeared sourdough would just take this whole dish to heaven. But I didn’t tell you that!

Serves: 2

Ingredients

1tbs olive oil

150g potatoes, peeled and cut into 2cm cubes

200g sweet potato, peeled and cut into 2cm cubes

100ml water

Salt and pepper, to taste

100g black pudding ( I used Clonakilty), diced

150g cherry tomatoes

1 spring onion, thinly sliced

1 birds eye chilli, finely diced

2 second spray olive oil

2 eggs

Method

  1. Heat oil in a heavy-based frypan (a cast iron skillet is perfect) on high heat. Fry potato and sweet potato, stirring occasionally for 5 minutes, until coloured and starting to soften.
  2. Gently pour water over the potatoes (this is dramatic, noisy, and may set off your smoke detector, but it’s kind of fun), and add a good grinding of salt and pepper.
  3. Turn the heat down to medium-low and cook the potatoes for another 10 minutes or so, stirring occasionally to avoid them sticking to the pan.
  4. Add the black pudding and cook for 3 minutes or until heated through.
  5. In a separate pan, cook fry 2 eggs to your liking. I like a runny egg, so I crack it onto a pan over low heat and let it do its thing until the white is cooked through. All the better if the bottom goes crispy!
  6. Meanwhile, tumble tomatoes into the hash, and allow to cook without stirring, while the eggs cook.
  7. Give the hash one good stir to combine, and divide into two bowls. Top with egg, and sprinkle with spring onion and chilli.


Facebooktwitterredditpinterestlinkedinmail

Honey Soy Chicken with Mushroom and Cauliflower Rice

Sunday nights are for Roller Derby.

Which means Monday mornings are for sore thighs and Voltaren cream.

It also means that Sunday night dinners need to be made by the hubby (he’s more than capable), or be quick and easy for me to prepare before or after . This past Sunday, I combined the two, and had hubby roast the chicken while I somewhat literally skated my butt off, then came home and whipped up this amazing and quick cauliflower rice dish from Primavera Kitchen.

Now, I used to think I wasn’t big on food trends, but my obsession with zoodles, and now realising how fabulous cauliflower rice is, I guess I can’t lay claim to that any more. I am head over heels in love with this recipe. And at 81 calories for a really generous serve, nobody will judge you if (when) you take it to a whole new level with a sprinkle of parmesan cheese.

Best of all, it keeps! I took it to work the next day, then forgot about it (entirely possible when you stash soup in your work freezer like I do), which made for a happy lunch surprise today (Tuesday). In summary, this is perfect Sunday meal prep fodder. Because on Sundays, we meal prep, right?!

The only significant change to the original recipe I made here was that I used beef stock because I forgot to buy the vegetable kind, and I am far too slack to always have a stash of homemade stock. So, it’s no longer vegetarian. But then, neither am I, so no worries there. Oh, and I used spray olive oil, because when you only eat 1200 calories, you don’t want to spend 50 of them on oil.

Ingredients 

  • 2-3 second spray olive oil.
  • 1 stalk celery, diced
  • 1 brown onion, chopped
  • 1 tsp minced garlic
  • 1 tsp minced ginger
  • 300g mushrooms
  • 1 head of cauliflower
  • 1/2 cup good quality beef stock (I see no reason why you couldn’t use any flavour)
  • 2tbs soy sauce
  • 60g baby spinach
  • Salt and pepper to taste
  • 1 tbsp parsley

Method

  1. Cut cauliflower into large florets and pulse in a food processor until it reaches a rice-like consistency.
  2. Heat oil in a large frypan on medium heat. Add onions and celery and cook for 4 minutes, until tender.
  3. Add ginger and garlic and cook for 30 seconds.
  4. Add mushrooms and sauté for 5 minutes, until soft and juices are released.
  5. Stir in the cauliflower rice and sautee for one minute.
  6. Add the vegetable broth. Simmer for 5 minutes, for the cauliflower rice to absorb the vegetable broth and soften. Be sure not to let it get soggy.
  7. Mix in baby spinach and cook for 2 minutes.
  8. Add soy sauce and mix to combine.
  9. Season with parsley and salt and pepper to taste, .

Honey Soy Chicken 

Ingredients

8 chicken drumsticks

1/4 cup soy sauce

2tbs honey

1tsp ginger

1tbs garlic

1tbs sweet chilli sauce.

Method

  1. Preheat oven to 200°C. Prepare and grease large baking dish. Add chicken.
  2. Combine all other ingredients in a jug. Pour over chicken, turning to coat.
  3.  Place chicken in fridge for 1 hour for flavours to develop.
  4. Bake chicken, covered with foil, for 50 minutes- 1 hour, until cooked through and juice run clear.
  5. Serve with cauliflower rice.


Facebooktwitterredditpinterestlinkedinmail

Smoky Chicken with Pomegranate and Mango Chutney


I’m going to be honest here… this one didn’t really speak to my kids. I  mean, they ate it and seemed to enjoy the fruity chutney, but they weren’t super stoked about the chicken itself.

They’re insane. Or, they’re 10 and 7… same thing, really. I knew going in that the kids probably wouldn’t be raving about this one. But I was itching for something new and different.

This dish certainly ticked those boxes – it was complex and intriguing, and no two bites tasted exactly the same. The intense smokiness of the chicken was tempered by the sweet tang of the chutney, which also mellowed the gentle bitterness of the brussels sprouts.

It also was one of those recipes that taught me something about myself – that it takes a couple of F bombs, a youtube video and a huge mess for me to extract the seeds from a pomegranate. This was not a family-friendly procedure. But now I know how to do it effectively, so I guess it’s one less thing to fear in the kitchen. Pomegranate seeds and naughty words for everybody!

This recipe was (barely) adapted from my new favourite recipe site, Clean Eating Magazine. I changed a few things around to have it fit into my particular preferences, but the essence of the recipe remains virtually untouched. All together, what you see in the photo was 357 calories, which is pretty low cal for a full meal.

Serves: 4 (smallish meals)

Ingredients

1 tsp cocoa powder

3tbs paprika

1 tsp ground ginger

1/2 tsp ground nutmeg

A couple of cracks of rock salt

Spray olive oil

1 red onion

1tbs minced ginger

1/2tsp chilli flakes

250g frozen (or fresh) mango

1/2tsp cinnamon

1 pomegranate, seeded in whatever inelegant fashion that gets the job done

1/3 cup apple cider vinegar

1.3 tbs honey

steamed baby potatoes, beans and carrots, to serve

sauteed brussels sprouts (because boiling or steaming them should be illegal), to serve


Method

  1. Preheat oven 180°F, and line a shallow baking dish with foil. Lightly spray with oil.
  2. Combine paprika, cocoa, ginger, nutmeg and salt. Add chicken and coat.
  3. Transfer chicken to prepared dish and cover with foil. Bake until cooked through. This should take about 30 minutes, but your oven may vary.
  4. Meanwhile, heat oil in a saucepan over medium heat. Add onion, ginger and chilli flakes. Cook, stirring often, until onion softens but does not colour.

    This chutney is purposely saucier than the original recipe. The mango should hold some structural integrity, though!
  5. Stir in garlic and sauté until fragrant, for roughly 30 seconds. Add remaining ingredients and cook, stirring occasionally, for 20 minutes.
  1. To serve, top chicken with chutney, and add vegetables. This chutney also does amazing things to the humble steamed potatoes.
Facebooktwitterredditpinterestlinkedinmail

Zucchini and Mushroom toast


Like so many of us, I tend to be stuck in a lunch rut. During the week, I eat a lot of soup (usually vegetable or lentil soup that I’ve made on the weekend), tuna veggies and brown rice, or leftovers. I’m far too busy in the morning to make lunch a huge priority, so I stick with what I know works for me.

As such, weekends are for something a little different.

Yesterday was Easter, and while I didn’t indulge outrageously, it amazed me that I so keenly felt the impact of eating so differently for just one day. Today, I crave veggies. Who am I to argue?!

Since August, I have realised that I am a hopeless mushroom junkie. Mushrooms belong in EVERYTHING. Garlicky mushrooms are the ambrosia of the gods. I’ve also come to realise that after 31 years

Seriously, it’s ridiculous how therapeutic I find this!

of believing the exact opposite, I don’t hate zucchini. I hate steamed zucchini, but will happily munch on sauteed, roasted or raw zucchini, especially if it means I can put it through my beloved spiraliser first! I’m not much of a kitchen appliance tragic, but there are no words for how much I adore this thing. SO. MUCH. FUN.


So when I stumbled across this recipe from Mushrooms Australia, that combined the veggies I love most and gave me an excuse to bring down my spiraliser, there was little doubt left in my mind about what we were having for lunch this warm public holiday. It’s the easiest thing to make, but it’s a little different, and the taste belies the simplicity involved. I’ve adapted it a fair amount, and while the original looks great, this was far more in line with what I was after in my mind. And it certainly delivered… Just ask Master 10!

Zucchini and Mushroom toast

Serves 3 – 165 calories per serve

Ingredients

5g olive oil spray

1tsp minced garlic

200g button mushrooms, sliced

250g zucchini

200g cherry tomatoes

3 x slices bread

30g cottage cheese

2tbs grated parmesan cheese

Pepper, to season

Method

1. Spiralise or julienne the  zucchini and set aside.

2. Heat oil in a large fry pan over medium heat. Add garlic and mushrooms, stirring until mushrooms have softened and released their juices.

3. Add cherry tomatoes, cover, reduce heat to low and cook for 3 minutes until softened.

4. Add zucchini and cook, stirring, for 2 minutes, so that it retains it’s firmness.

5.  Place over toast spread with cottage cheese, and top with parmesan and pepper.


Facebooktwitterredditpinterestlinkedinmail

New and Improved!

A friend of mine mentioned on my Instagram account the other day that I should include recipes with the pictures I post. I immediately thought, “well that’s why I have a blog”.

Then I realised it’s been 12 months since I posted anything here. And that there was a 6 month gap between that and the post before it. Ok… So maybe it’s a little disingenuous to say I have a blog.

It is clearly time to poop or get off the pot, and I’ve been looking for a new project, so the choice rather made itself!

Life has changed in many ways since I last posted, and these changes will definitely affect the direction and content of this little website. My main hurdle to blogging in version 1.0 was certainly time – between work, uni and family, I simply didn’t have any. I’m glad to announce that I graduated with a Masters degree in teacher librarianship last December, so while work is still crazy and Spunky Tech Guy, Master 9 and Miss 7 keep me well and truly on my toes, I now have one less major commitment to worry about.

Just as I have the time to maintain a blog (and the inclination – I had to blog for uni, and it sucked all the fun out of it!), I also have a better sense of direction for What’s Cooking Good Looking. Since August 2017, I have lost 41 kilograms (that’s 90 pounds)! I have cut nothing out – I still eat treats, I still make fun and varied dishes, and I still have a passion for cooking. I just eat a little less of it, with a better sense of balance, and I walk and/or run 5km daily. I count my calories using My Fitness Pal, and have built an amazing support network of friends there. No tricks, no gimmicks. I just educated myself on eating well, and stopped lying to myself about what I was doing.

All that to say, I want this blog to be a celebration of healthy, family friendly eating. I’m pretty blessed in that my kids eat pretty much anything I put in front of them, and the only argument I have to have with them about vegetables is when they eat the salad ingredients they know I need for dinner that night. Still, STG and I are responsible for their development, and it’s important to me that the kids follow a healthy lifestyle, so we talk a lot about making good choices and eating whole, nutritious food while stressing that it’s absolutely okay to indulge once in a while, too!

It’s also very important to me that we eat food that is awesome and honest in it’s own right. Everything I cook has easy to obtain ingredients, and is usually fairly budget conscious. I also don’t want to eat or share “fat free, dairy free, carb free” anything. I want to appreciate food for what it is, not resent it or only accept it for what it isn’t (allergies/sensitivities aren’t something I have to worry about). While the majority of what I post about will be low calorie, relatively “clean” food, I don’t subscribe to any diet or food fad, and you won’t find anything described as paleo, XYZ-free, “better for you”, or diet in the title (even if it is one, some or all of those things). These recipes are what they are. If you’re after a low fat, sugar free, grain free cheesecake, you and I see the point of cheesecake in very different ways.

You can be relatively confident that everything I post fits comfortably into an active lifestyle in which 1200-1500 calories are consumed across 3 meals and a couple of snacks, and I will likely post the amount of calories of the dish, simply because I calculate them on MFP, so I know that information already. But I’m not a nutritionist or dietitian, I’m not looking to give advice (I’m just sharing my experiences and recipes!), and those calculations aren’t guaranteed.

I’m really looking forward to seeing how this blog goes. I get a lot of “I can’t believe you’ve lost so much weight and still cook food that looks like that”. Honestly, I’d never have lost any weight if I had to restrict what I ate to lettuce and grilled chicken (although I eat my fair share of both). I genuinely love food and cooking even more now that I’m eating so well, and I am excited to share my journey with you all.


Facebooktwitterredditpinterestlinkedinmail

Chocolate Choc Chip Hot Cross Buns

All I wanted in life were homemade hot cross buns that were as tall and fluffy as the buns you buy at the stores. Was that really so much to ask?

“Yes!” Screamed the universe, time and again.

Hot cross buns have long been my kitchen kryptonite. I  faithfully follow recipe after recipe, only to end up with vaguely spiced house bricks. Even my most trustworthy sources result in sad, flat, dry discs. My first attempt was so unlike the intended product that they were dubbed “not cross buns” by the not-as-funny-as-he-thinks-he-is Master 8.

And the crosses were indeed my culinary cross to bear. So many failed methods tried, like spooning them into scored dough. I’ll spare you the humiliating details of that venture and leave it at nope. However I did it, they were always either too fat or too wet or too messy or too straggly, and never quite enough like ancient execution contraptions jauntily placed upon seasonal baked goods.

So, I didn’t really expect that a recipe that randomly appeared on my Instagram feed would be any different, especially as I didn’t think I was interested in a chocolate bun recipe, but it’s 4 days until Easter, and I just couldn’t resist.

And thank heavens I did not, because let me tell you, I have found The One. The holy grail of HCB recipes. Tall, fluffy, soft, and – despite the chocolate – just sweet enough to be sweet. Delicious.

I’ve adapted the linked recipe to suit my own preferences, equipment and pantry items. I suspect this is a relatively forgiving recipe, or at least as forgiving as baking gets.

Choc Cross Buns

1 1/2 tsp yeast
1 cup milk, warmed
1tbsp caster sugar
3 cups self raising flour
1/4 cup cocoa
1 teaspoons cinnamon
1/2 teaspoon nutmeg
2tbs caster sugar
60g butter, chopped
1 egg, lightly beaten
2/3 cup chocolate chips (a mix of milk and white chocolate is the best)
 
Crosses
1/2 cup plain flour
2 teaspoon raw caster sugar
4tbs cold water
 
Glaze
1 teaspoon gelatine powder
2 teaspoons raw caster sugar
1 tablespoon boiling water
 
Method:
Prepare a 20cm square cake tin with baking paper.
 
 Combine yeast, milk and 1 tablespoon sugar in a bowl. Cover and set aside in a warm place for 10 minutes or until foamy.
 
Sift flour, cocoa and spices into a bowl. Rub in butter until mixture resembles damp sand.
 
Make a well in the centre. Add yeast mixture, egg and sugar. Stir to combine. Turn onto a lightly floured surface. Knead for 10 minutes, or until smooth and super elastic. When you think you’ve kneaded enough, go for 2 minutes more.
 
 Transfer to a lightly oiled bowl. Cover. Set aside  for 1 hour or until doubled in size.
 
Punch dough down. Turn onto a floured surface. Knead for 5 minutes or until smooth. Make a well in the centre, and add 1/4 choc chips. Cover chocolate with sides of dough and knead to combine. Repeat until all chocolate chips are incorporated.
 
 Roll into 16 equal-sized balls. Place in prepared pan. Cover. Set aside  for 30 minutes or until dough has almost doubled in size. Preheat oven to 200°C.
 
To make crosses, combine flour, sugar and cold water in a bowl. Spoon the paste into a piping bag or strong sandwich/zip-lock bag. Snip 1 corner from bag. Pipe crosses onto the top of each bun.
 
Even raw, they look pretty!
 
Bake for 10 minutes. Reduce heat to 160°C fan-forced. Cook for 15 minutes.
 
To glaze, whisk gelatine, sugar and boiling water in a heatproof jug until gelatine has dissolved. Brush over hot buns.


Facebooktwitterredditpinterestlinkedinmail

Currant-ly addicted to these biscuits

_20160925_113820
They’re humble, but they get the job done!

We do not have biscuits and cookies in our house as a staple, because we try to keep our pantry healthy  I have no self control. Of all the delicious biscuits in the world – from Tim Tams with all their splendid new flavours to the humble jam drop – the pack of cookies I am most likely to devour in one sitting is the favourite of Grandmas Australia-wide, the Venetian. They’re so light, so yummy, so moreish, that I just cannot help myself. However, Spunky Tech Guy has a bizarre preference for un-iced currant biscuits, and I try to avoid Venetians, which led me to track down one disappointingly dull brand after another. As necessity is indeed the mother of invention, I took it upon myself to adapt several recipes into the only currant biscuit you’ll ever need.

What resulted was a treat so delightful, so crumbly and subtly tasty, that Spunky Tech Guy has been heard complaining in the kitchen, “I don’t know why you make these cookies! Why can’t you make normal boring cookies? This is number six. SIX!”

Okay, so they’re just as addictive as Venetians, although they’re vastly different. Even the kids have had to have their hands swatted away all morning. In fact, Miss 5 got kicked out of the kitchen just so I’d have some dough left to put in the oven. Yes, I let them eat small amounts of raw cookie dough. I am a terrible mother, but I cannot deprive my kids of the simplest pleasures of cooking!

I’ve been making these for a while now, but I ran out of citrus fruit this morning, so I used OJ instead of zest. I also made a rookie mistake and used SR flour instead of plain by accident. These changes lifted the biscuits (literally) in a way I wouldn’t have imagined.

If you’re searching for the perfect companion to a cup of tea, look no further! Depending on how much of the sticky, scrummy dough gets pilfered, the recipe yields around 20.

Ingredients

2 cups self raising flour (plain works just as well, but SR gives it a satisfying dome shape)

150g butter, cubed

1/2 cup caster sugar

1/2 cup currants

1/2 cup dark chocolate chips

1tbs pulpy orange juice

1 egg, lightly beaten

Method

1. Preheat oven to 160°C. Line 2 trays with non stick paper.

2. Sift flour and rub in the butter until the mixture resembles damp sand (I know everyone says breadcrumbs, but I really think it is more sandy).

3. Mix in sugar, chocolate and currants.

4. Combine egg and juice. Add to mixture and stir to combine.

5. Dollop tablespoons of mixture onto trays and bake for 15 minutes, or until lightly browned.

6. Try not to eat them all in one day. Ha. Good luck.

Facebooktwitterredditpinterestlinkedinmail

All aboard the sushi train


Thanks for lunch, kids!

Despite my left-wing history teacher training and mindset, I have absolutely no issue with cultural appropriation when it comes to food. I love eating at diverse restaurants, and when that’s not an option, travelling around the world without leaving my kitchen. Authentic is best, but I’m also open to a creative mish-mash of cultures. I’m$ not above using authentic recipes and substituting for what I can find or what I have on hand.

I also am quite confident that if I had to choose just one cuisine to eat for the rest of my life, I’d be fighting tooth and nail to ensure that all Asian national foods were able to be lumped together as  “Asian cuisine”, with an appalling disregard for cultural sensitivity. I simply can’t decide which I love the best (as long as it’s not nasty deep fried Chinese takeaway. Even I have standards).

Luckily, the men in my life are also partial to a variety of Asian foods. (Miss 5 is less enthusiastic about some dishes, but my MO for that little issue is to ignore it and cook it anyway). As such, Master 8 was delighted when I came home from grocery shopping with all the ingredients for sushi for lunch. It’s safe to say with some assistance, the kids made lunch today. About time 🙂

Who knew messy kids could be so neat?!

Miss 5 wouldn’t eat it, she’s never liked sushi (how could someone who is a mix of Spunky Tech Guy and my DNA not like sushi?!), so she had a fried egg and cheddar sandwich, the old-faithful of this house.

Doesn’t mean she didn’t have fun making it… she just reminded us intermittently that sushi is gross!

Yum!
Sorry, Miss 5… Sushi is NOT gross!
Facebooktwitterredditpinterestlinkedinmail

Transformation Rice… it’s anime-zing!

It comes as no great shock to anyone who has met our little family that we’re a group of nerds. Over the past 14 years, Spunky Tech Guy has led me further and further down the rabbit hole of fandom and together we’re successfully raising our kids to appreciate traditional and graphic novels, comics, video games, super hero multiverses, and quality television from around the globe.

Even I was surprised that our love of anime would infiltrate into my savory cooking repertoire. Yet here we are. Tonight’s meal was 100% inspired (stolen) from the second episode of Food Wars, an anime about chefs in an exclusive cooking school, whose only response to each others’ dishes seem to be revulsion or vivid foodgasm (it’s not one for the kids).

watch it on https://www.animelab.com/player/food-wars-episode-1
watch it on https://www.animelab.com/player/food-wars-episode-2

This dish, transformation rice, is what awards our hero Soma-kun a place in the cut-throat school. It is a seemingly simple rice and chicken meal, with a burst of umami deliciousness from the melting of a meat broth jelly that is made from the most divine stock I have ever made, over the rice and chicken. It’s time consuming, but not in the slightest bit difficult. And it’s fun!

I don’t think the credits had finished rolling when my phone went off that night. It was STG, who was sitting right beside me, sending a link:

http://anitay.kinja.com/food-wars-recipes-in-real-life-2-transformation-rice-1711019009

Crafty bugger had found a website that details all the major dishes in the anime. And the look on his face was reminiscent of a puppy who heard the word chicken. Sigh. So because he is pretty spunky, and the dish did look phenomenal, I felt no alternative was possible but to adapt the recipe and make it my own:


Don't be fooled by it's simplicity - it sure seemed to arouse the tastebuds of every character who ate ti!
Don’t be fooled by it’s simplicity – it sure seemed to arouse the tastebuds of every character who ate ti!

–2tbs  of sesame oil

– 12 chicken wings
– 500ml good quality fish stock
-2tsp minced ginger
-3tbs brown sugar
-75ml soy sauce.
-100ml vodka (the original recipe calls for sake, but I’m cheap and already had vodka)
-2 teaspoons powdered gelatine.
-100ml water
-1.5 cups white rice.
-4 green onions.
-8 eggs.

Method

1. Fry the wings in sesame oil, in 2 batches, for 10 minutes per batch until golden brown.

2. Bring the stock and water to the boil in a large saucepan. Add chicken, leaving any juices and burnt bits in the frypan. Turn heat down to low.

3. Add the soy sauce, vodka, ginger, and brown sugar to the frypan, and cook on low to thicken and deglaze the pan. Pour into the stock.

4. Simmer for 30 minutes. Remove from heat and allow to cool for 10 minutes. Scoop off any scum, and set the chicken aside.

So rich and deep, this broth is insane.

5. Add gelatine to 100ml water, and stir thoroughly. Add to stock.

6. Grease a large, deep dish (such as a roasting dish) with butter, and pour in the liquid. Cover and refrigerate for 2 hours.

7. Meanwhile, pull all of the chicken off the bone, and set aside in fridge until needed. The chicken is freaking delicious, I’ll be serving it as a stand alone recipe in the future. Try not to eat it while deboning. 

Seriously. So good. Will serve with salad next time.

8. Cook the rice using the absorption method. In the last few minutes, add the chicken to warm.

9. Cut the aspic jelly into 2cm cubes. No bigger, or the melting effect will be lost.

No one said meat broth jelly was pretty.

10. Scramble the eggs. Don’t dry them out!

11. Place rice into individual bowls. Top with egg and green onions.

12. While everything is piping hot, top with aspic. Watch it melt. Try not to cry tears of joy.

My attempt - not as pretty as the anime, but absolutely delicious!
My attempt – not as pretty as the anime, but absolutely delicious!


 Facebooktwitterredditpinterestlinkedinmail