It’s that time of year again – less than 6 weeks until Christmas! And while it takes me by surprise every year, this year is all the more jarring – how could 2021 go soooooo slooooowly, yet fly by? I’m still wrapping my head around 2020, and it’s nearly 2022??
Anyway, in light of having just over a month to organise the Christmas Chaos, AND an assignment to procrastinate, it’s the perfect time to test bake. I will, of course, be making my famous pfeffernusse, but I like to make something different, too. And these are delightful! The aroma of bashed pistachios is intoxicating, and the tart lemon icing and craisins make a great contrast for all the chocolatey, sweet delights available.
The only regret I have for these is that I made a small batch because I didn’t know how they’d go. I’ll keep the ratios as I made them, because my waist really doesn’t need double the amount, but trust me, double the quantity wouldn’t be unwelcome.
Makes 15
Ingredients
1/4 cup butter
1/2 cup white sugar
1/3 cup brown sugar
1 egg
2tbs milk
1tbs orange juice
1.5 cups self raising flour
1 cup craisins, chopped
1/2 cup pistachios, crushed (I use a mortar and pestle, or a ziplock bag and a rolling pin).
Icing
1/4 cup butter
1 cup icing sugar
1tsp vanilla
1tbs milk
1tbs lemon juice
Method
Preheat oven to 180°C. Prepare a silicone or other bake trays.
Cream butter and sugars until fluffy and pale.
Combine egg, milk and juice in a small bowl. Add to creamed butter mixture and continue to mix until incorporated.
Gently fold in flour until well combined. Add craisins and crushed nuts and mix.
Drop tablespoonfuls of the batter onto prepared tray, leaving about 5cm between cookies. Bake for 12-15 minutes, until golden brown.
Cool completely on wire racks.
Carefully melt butter for icing in the microwave. Cool for 5 minutes, them beat in the rest of the ingredients until smooth. Dip each cookie into the icing and allow to set.
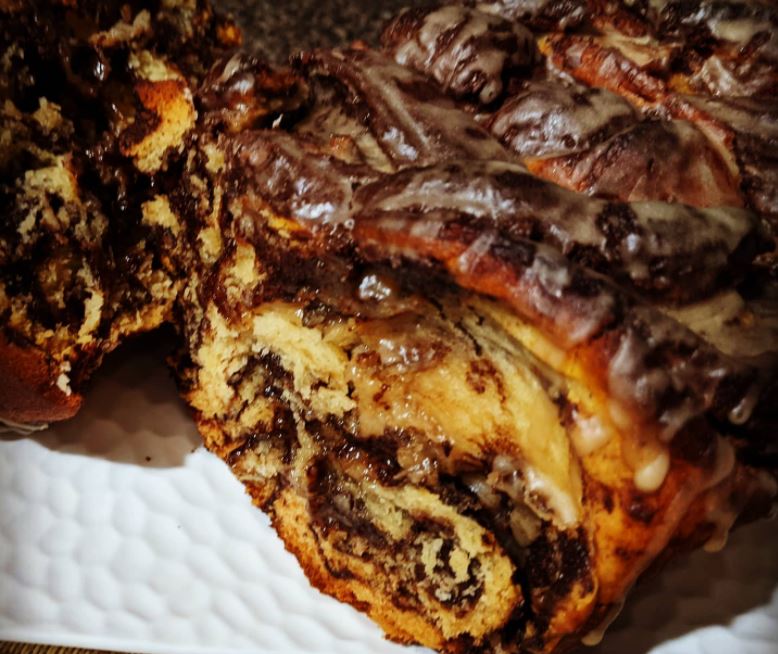
With all the good things in life checked off here, it’s of little wonder that this bread is sooooo good! It makes for an awesomely decadent treat (breakfast?) with a latte, and makes the whole house smell like heaven before you even pop it in the oven. I’ve missed baking so much (stupid busy lifestyle!), and this was the perfect way to get back into the swing of it. It was inspired by the Spiced Choc Coffee Loaf in the Woolworths Fresh magazine, and the fact that while I’d run out of mixed spice, I’ve got a whole stash of pfeffernüsse spice in my kitchen. I haven’t made the original, but my spice mix brings so much to the party that I won’t be omitting it.
The caveat is that it’s, um, nearly 500 calories a slice. But it’s legitimately bread, not cake, and although decadent, it is also filling. And it’s certainly a special occasion kind of recipe, so it’s not like you’d be adding it to your regular diet. And if you are, I kind of envy you!
Ingredients
Dough
3/4 cup milk
7g sachet yeast
1/3 cup caster sugar
3 1/3 cups plain flour
3 eggs, beaten
125g butter (I use salted – if yours is unsalted, add 1/2 tsp sea salt flakes), cubed
Combine milk, yeast and sugar, and rest for 10 minutes.
Place yeast mixture, flour and eggs into a bowl. Knead for 3 minutes until smooth (or 3 minutes in a stand mixer).
While continuing to knead, add butter one piece at a time, incorporating each into the dough before adding another. Knead for 10 minutes after the final piece, until smooth, glossy and elastic.
Place dough in a clean bowl. Cover with a clean tea towel and allow to rise for 1 hour, or up to 24 hours.
Preheat oven to 200°C and line a loaf pan with greased baking paper.
Melt chocolate and butter, and add sugar and spice mix. Stir to combine.
Divide dough in half. On a lightly floured surface, roll each half into a 35x40cm rectangle. Spread with chocolate mixture and roll into logs from the short edges.
Cut each log lengthways (use a very sharp knife for this or it will tear the dough). Twist two halves into one log, and then repeat with the remaining two logs.
Plait the two twisted logs into one large log and fold the edges underneath. Fit into the loaf pan, squishing the edges in if necessary, but aiming not to lose the twisted appearance.
Bake for 45 minutes. Stand for 15 minutes then remove from pan.
Combine the icing ingredients and drizzle over the loaf.
Growing up, one of the memories I have of staying with a Great Aunty was drinking tea and eating iced biscuits whose name I didn’t know. I only ever ate these biscuits at this one Aunty’s house, and I thought they were so very special. It was only when I was much older – well into my twenties – that I found them in the supermarket. Pfeffernüsse, that was them! And they were only a dollar a bag! I immediately brought some, and my dad and I agreed that these were the biscuits we both remembered.
Then I got a wild idea last year that I should make them myself. I came across The Daring Gourmet’s Best Authentic Pfeffernüsse, and she is not exaggerating! They’re so good that my daughter begged for a pfeffernüsse tower instead of a birthday cake this March, despite my insistence that these should be saved for December so they stay special. Everyone seems to love them, and even though most people won’t tell you to your face if they don’t love your cooking, they seem pretty enthusiastic about this recipe. I’ve tried a few other recipes, for science, but none of them come even close to these. I won’t take any credit for these beautiful gingerbread cookies, because I barely deviate from the original recipe, but I do find the website a little unwieldly, especially juggling two pages for the biscuit and the spice mix, so I’m putting it all together, here.
The spice mix recipe makes enough for at least two batches of pfeffernüsse, but it lasts a long time in a dark cupboard, and you’ll probably be reaching for it a few times, so go to town! The recipe takes a bit of forethought and planning, so having the spices ready to go makes life a lot easier.
Calories? Well, technically 150 per pfeffernüsse, but I’m yet to meet the person who can stop at one.
Pfeffernüsse Spice
Ingredients
2 1/2 tablespoons ground cinnamon
2 teaspoon ground cloves
1/2 teaspoon ground allspice
1/2 teaspoon ground coriander
1/2 teaspoon ground cardamom
1/2 teaspoon ground ginger
1 star anise, ground
1/4 teaspoon ground mace
1/4 teaspoon ground nutmeg
Method
If purchasing spices already ground, combine all ingredients in a cool, dark cupboard for up to 12 months. If your spices are whole, use a grinder or mortar and pestle (I’ve even resorted to a ramekin and a wooden rolling pin) to grind them as fine as possible. Discard any woody bits of star anise that don’t grind enough.
Pfeffernüsse
Ingredients
2 1/4 cups self raising flour
1/4 teaspoon salt
3-4 teaspoons pfeffernüsse spice
1/4 teaspoon finely ground white pepper
1/4 cup almond meal
1/2 cup packed brown sugar
1/3 cup honey
5 tablespoons butter
3 tablespoons thickened cream
1 large egg
For the Glaze:
2 1/2 cups icing sugar
1tsp vanilla essence
3 tablespoons hot water
Food colouring (optional – white is traditional)
Method
In a mixing bowl, combine the flour, salt, pfeffernüsse spice, white pepper and almond meal. Stir well.
In a small saucepan, combine brown sugar, honey, butter and cream. Melt over medium heat until smooth and combined. Cool slightly, about 5 minutes.
Pour melted butter mixture into dry ingredients and beat until very well combined. Add egg, and stir until the mixture is completely combined and has a nice shine. It will seem very wet and sticky – it dries out as it rests.
Tear off a large piece of cling film and double wrap, very tightly. Refrigerate overnight, or for up to 48 hours.
Preheat the oven to 180°C and line two baking trays with baking paper.
Remove dough from fridge and roll two teaspoons worth into balls, placing 2-3 cm apart, as they do spread a little. Bake for about 15 minutes: they should be firm but not hard or darkened.
Remove from oven and allow to cool completely.
Combine the ingredients for the glaze in a bowl and mix to combine. You want the consistency to be thick enough to hold on, but not so thick as to rip the fragile biscuit.
Dip each biscuit into the glaze, place on a wire rack with baking paper underneath, and allow to set completely.
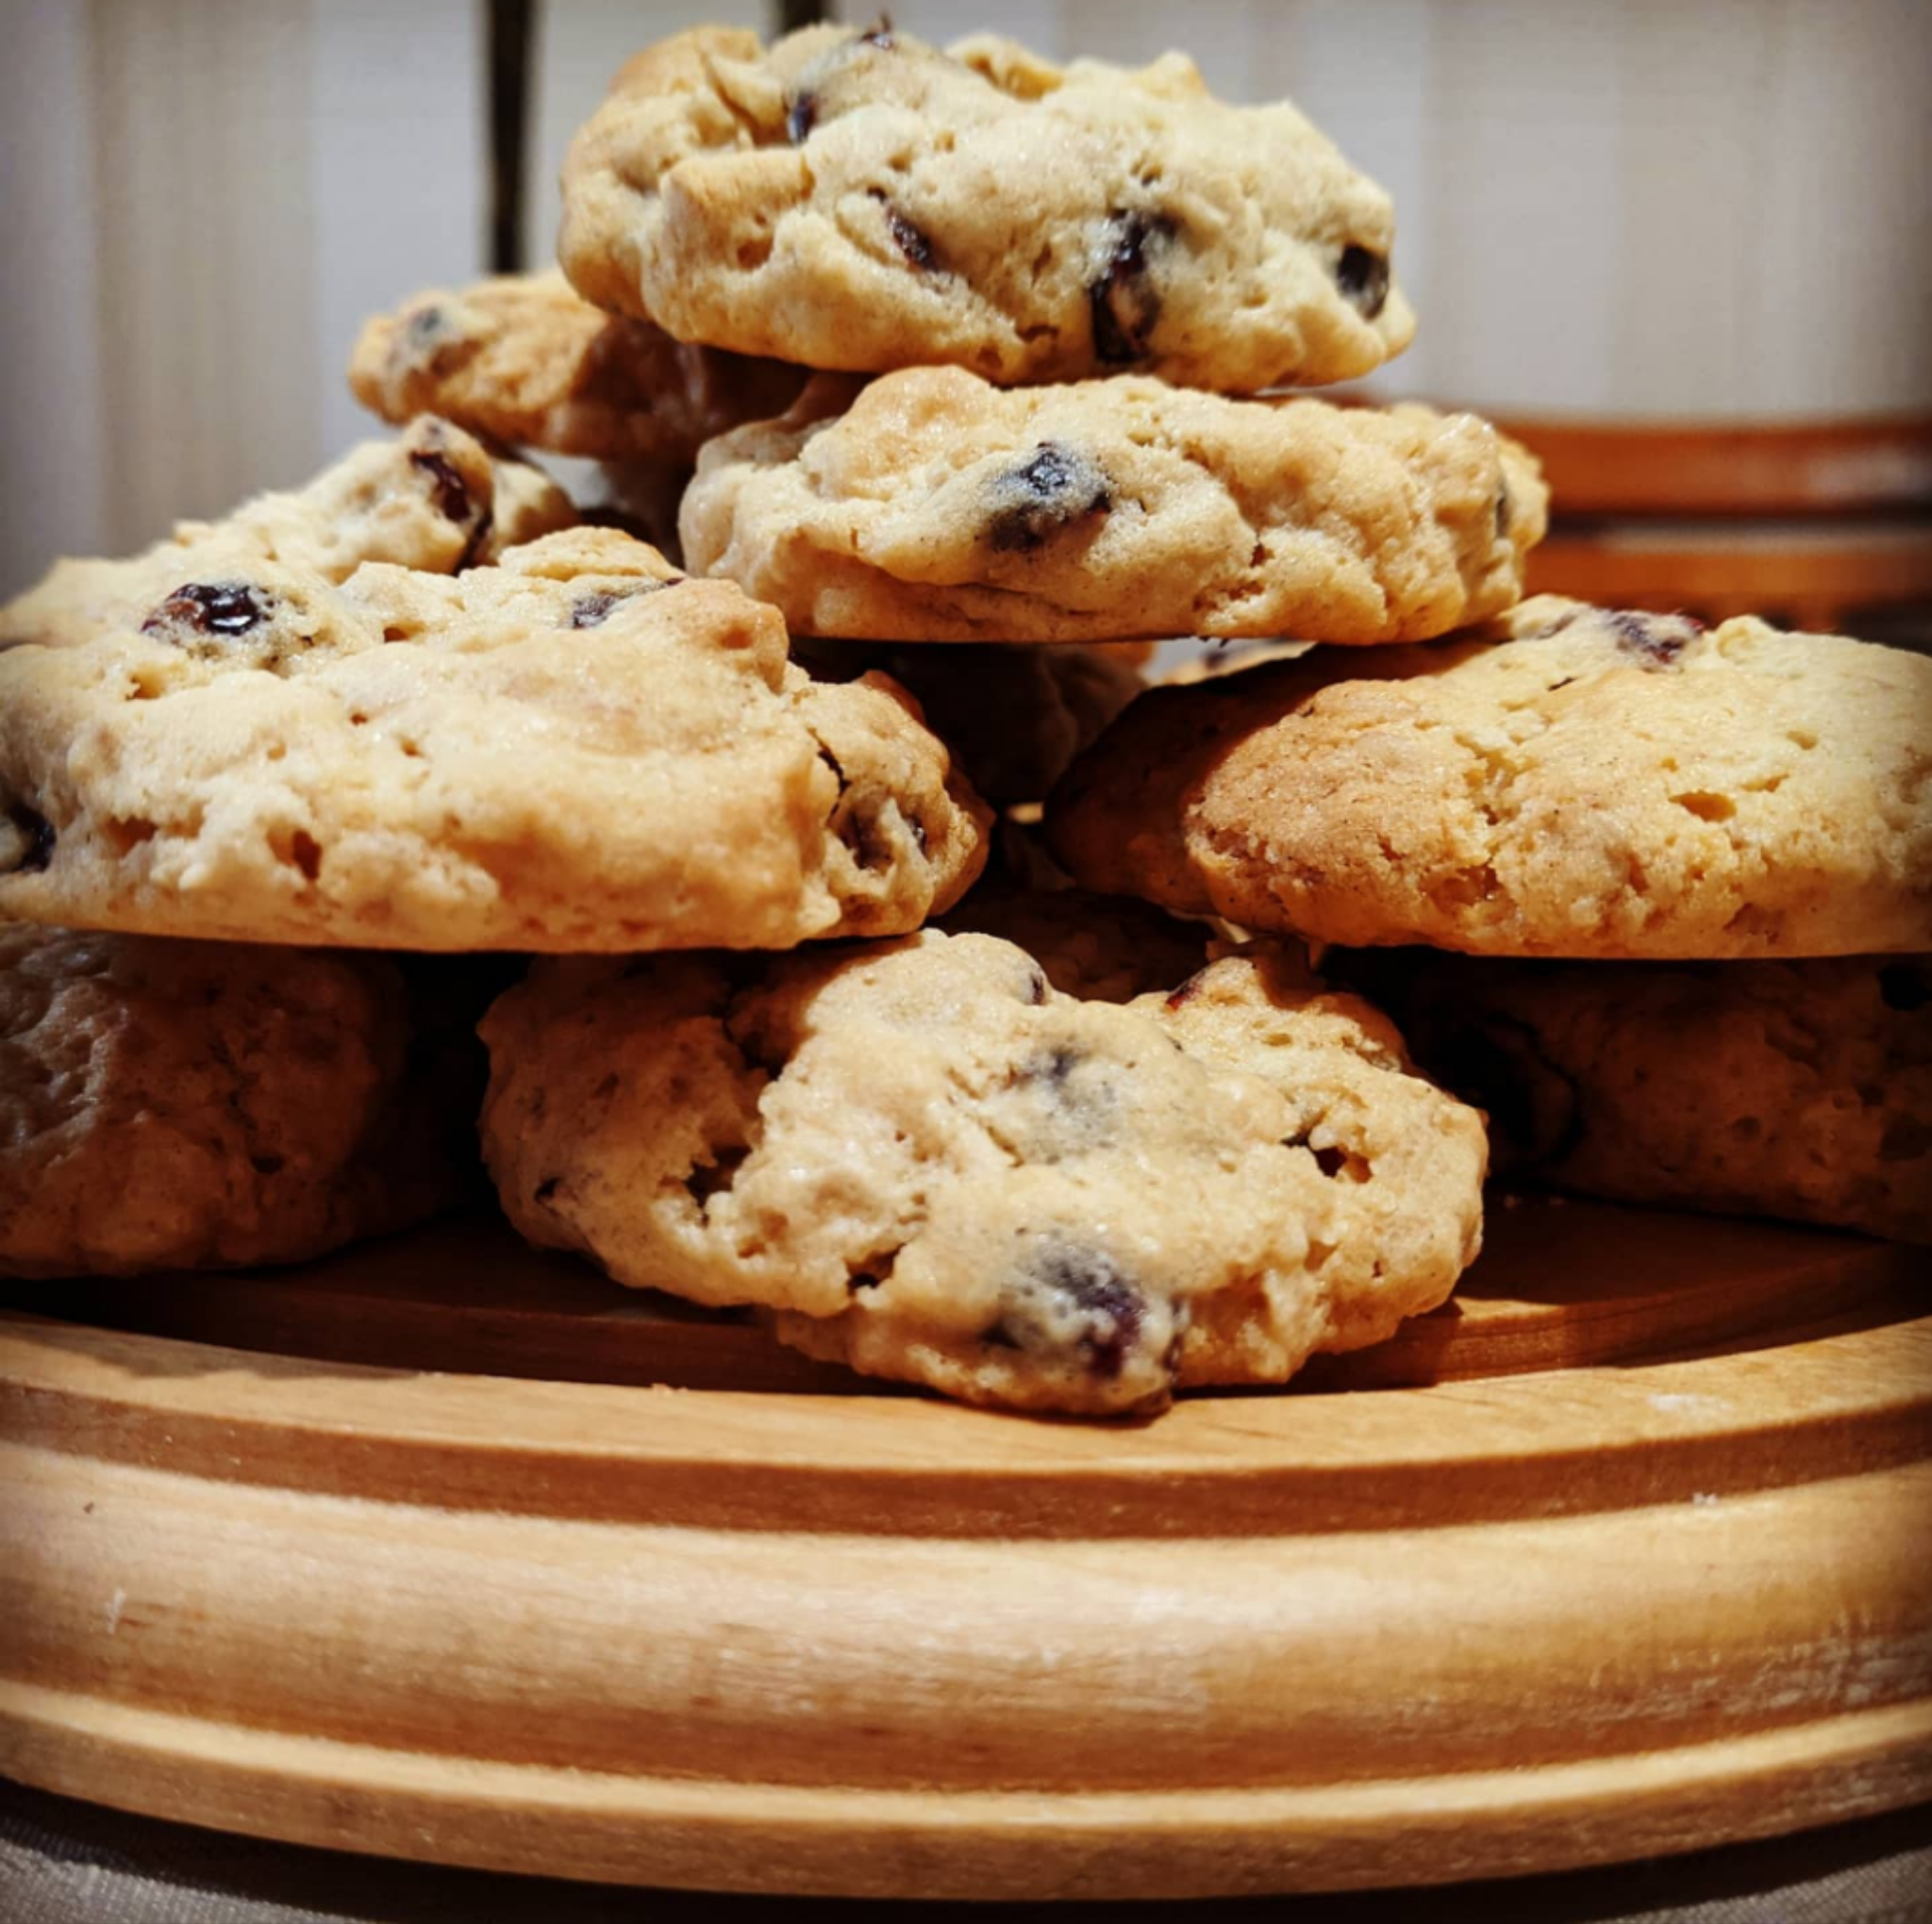
I’ve had an urge to bake cookies this week – I think it’s the cold, rainy weather – far more than I’ve actually had an urge to eat cookies. Surely I’m not the only person that craves the cook more than the result sometimes? However, the result of this urge wasn’t exactly a hardship: chewy, soft cookies that are tart and just sweet enough. Better yet, the result was just that little bit different to a standard chocolate chip cookie (not that I would ever badmouth such a classic!), without being as indulgent as my Reeces snickerdoodles or blackforest cookies (neither of which have made it to my blog, but surely I won’t hold on you forever!), and therefore the perfect compromise.
At 130 calories per cookie, these are pretty standard in terms of your chocolate chip biscuit, which was reassuring, because some cookies hit double this without much increase in size or flavour, and really, you want your treats to be worth it. To me, I haven’t met a cookie worth nearly 300 calories, but I find 130 calories is easy to build into a reasonable day. And really, we’re all entitled to a little treat now and then. The more time I spend in this healthier lifestyle, the less I worry about numbers. It’s a liberating feeling, but I still like knowing what I’m eating, so I keep tabs on caloric values, even if I no longer count them like I used to.
Yield: 24 cookies
Ingredients
1/2 cup butter, softened
1/2 cup brown sugar
1/4 cup white sugar
1 egg
1tsp vanilla extract
1 cup rolled oats
1 cup self raising flour
pinch of salt
3/4 cup craisins
1/2 cup white chocolate chips
Method
Preheat oven to 175C and line 3 baking trays with baking paper.
Beat sugars and butter for 5 minutes, until pale and creamy. Add egg and vanilla, and beat to incorporate.
In a separate bowl, combine remaining ingredients. Add to butter mixture a little at a time, mixing until completely combined.
Roll tablespoonfuls into balls and place 8 on each tray, leaving a few centimetres for slight spreading.
Bake for 15 minutes until firm and golden. Cool on tray for a few minutes, then move to a cooling rack.
NB from Master 12, Miss 9 and The Husband: apparently, they make a fantastic ice cream sandwich.
NB from Mac the dog:
“I am the goodest boy and didn’t eat the cookies, even though Mama left us together unsupervised. She should reward me. With cookies.”
If watching shows like Masterchef has taught me anything, it’s that a) you can’t cook without a lame sob story, and b) crème pâtissière is technical and difficult.
Both of these assertions are bull. I knew the former was a load of tripe cooked up by desperate television producers, but for some reason, fell hook, line and sinker for the latter. I’ve always just avoided it, made desserts that don’t call for it. I really don’t cook decadent desserts all that regularly, and there are a slew of other options, so I’ve been able to keep my fear of the Crème pât my little secret for years.
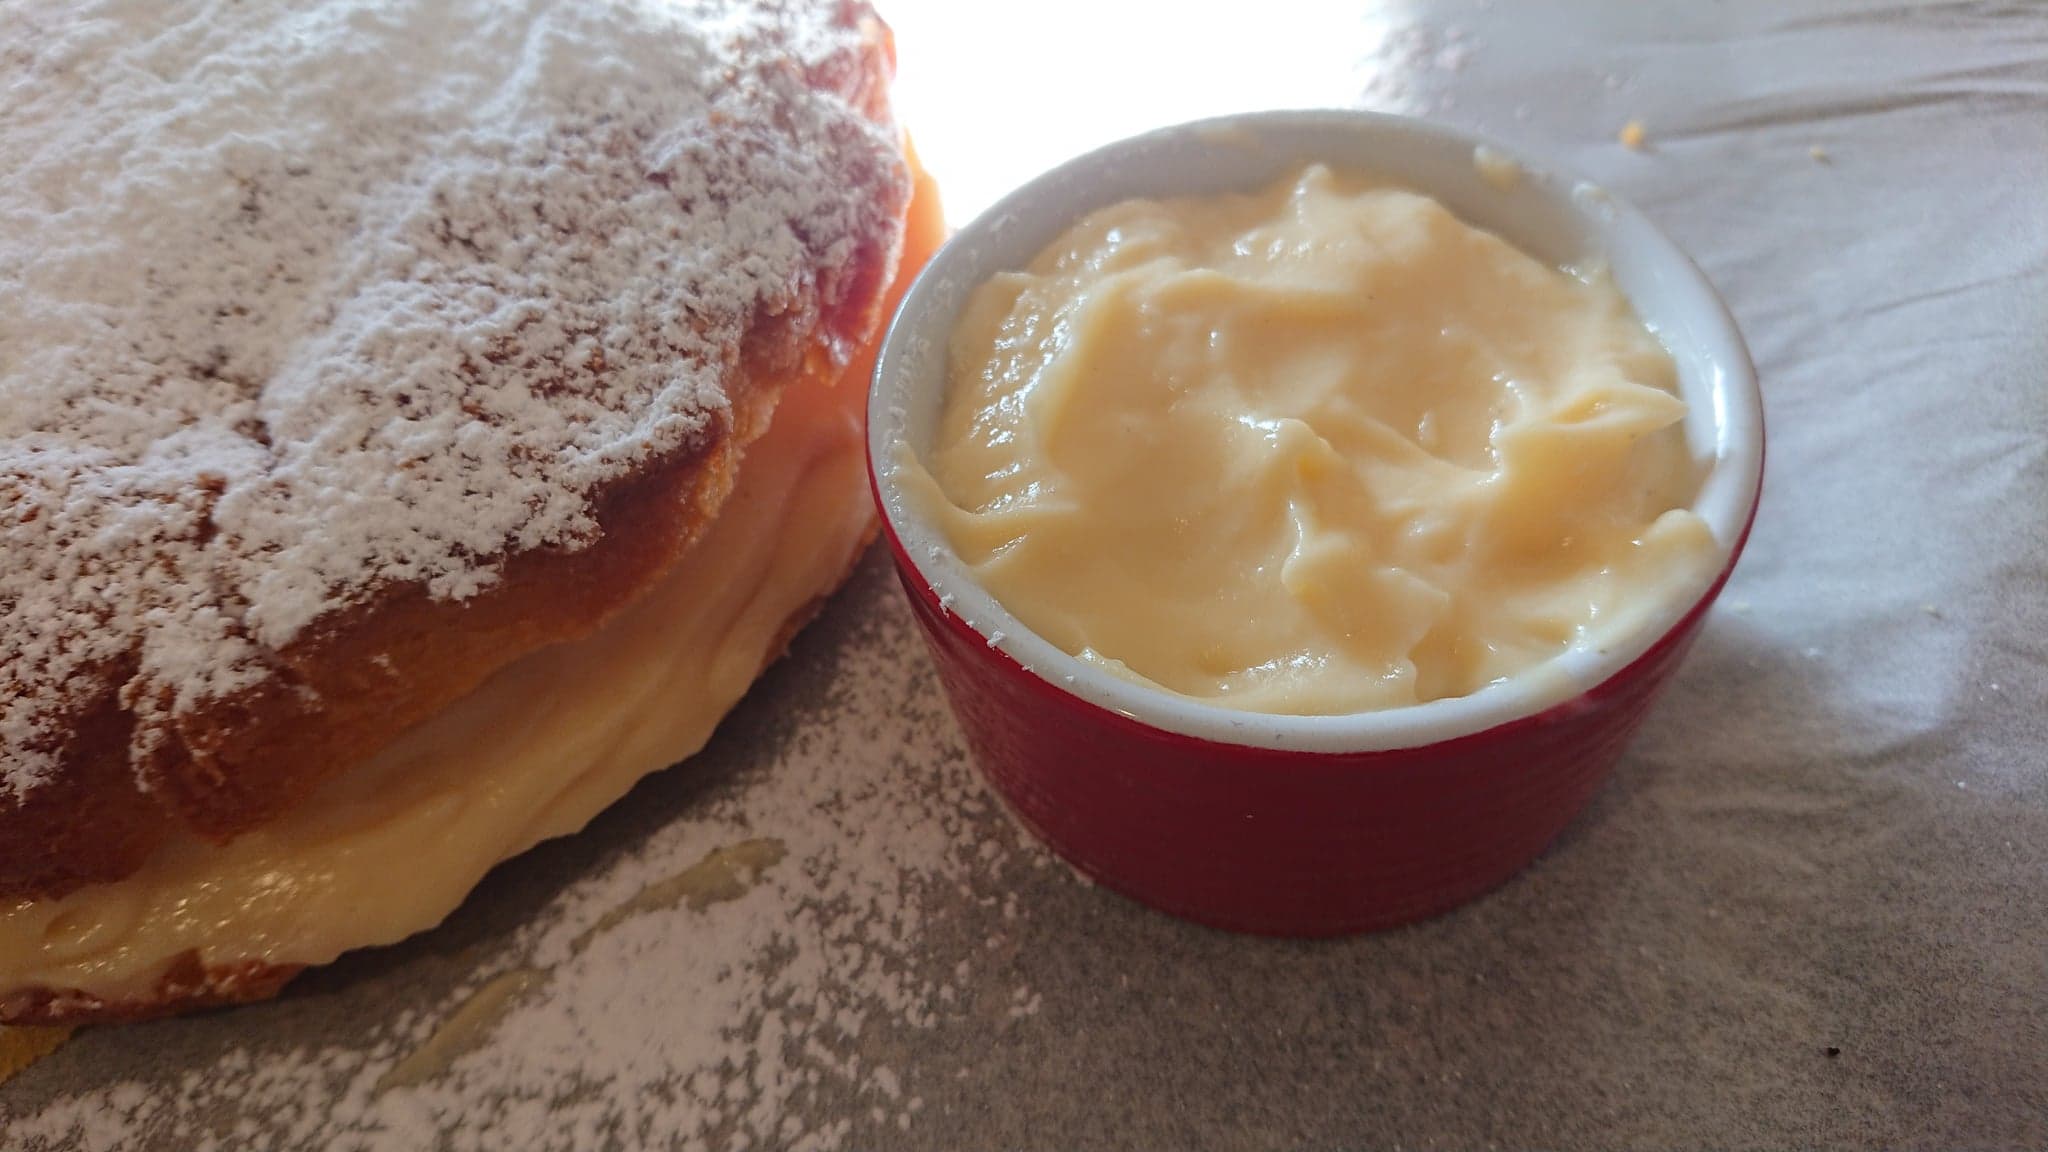
This week, my son turned 11, and the little foodie wanted creme brûlée donuts as his birthday cake. Unwilling to disappoint my first born, and after finding a recipe from Sugar Hero that looked better than the rest, I set out to make his donuts.
The first batch – so good!
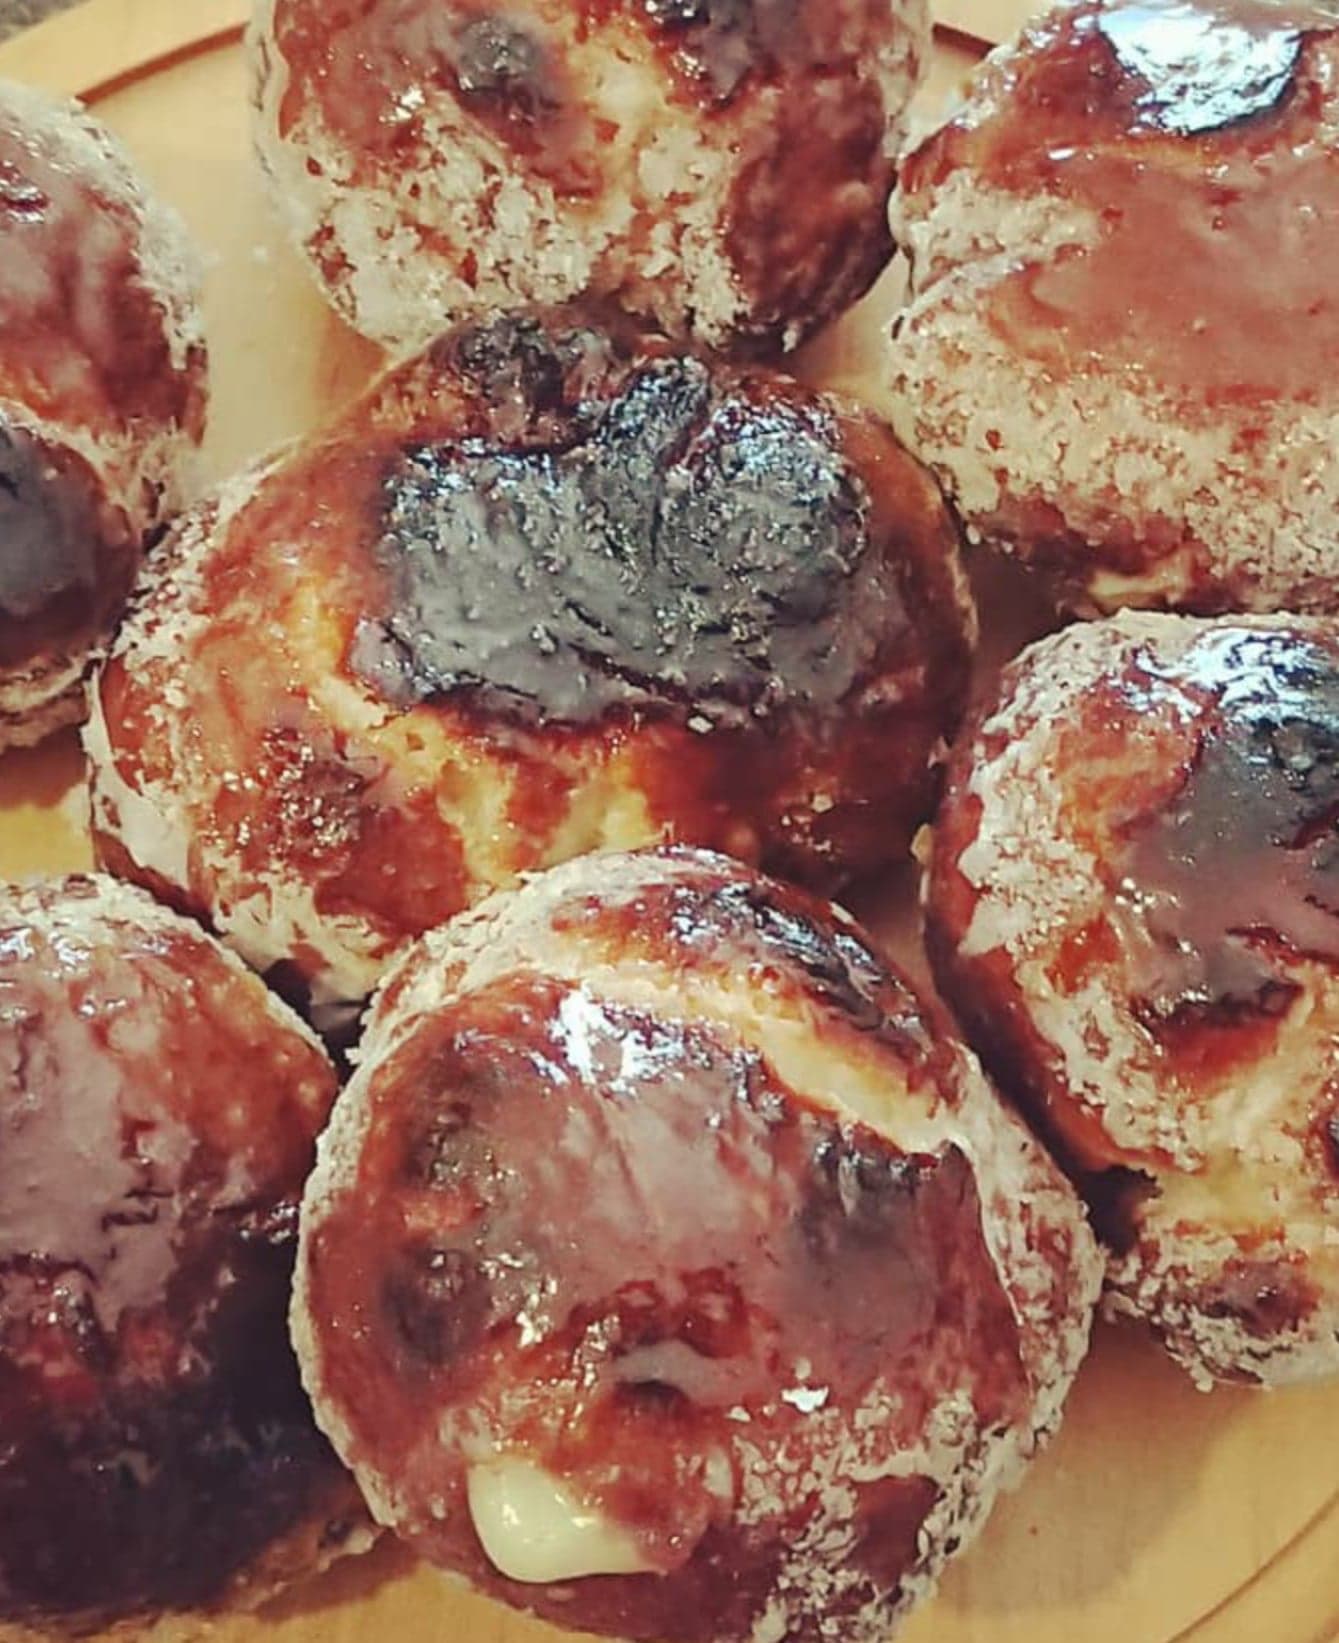
I’m still perfecting them, to be honest. The test batch were perfection. They were moist and fluffy, stuffed with silky, delicious creme patissiere, coated in a vanilla glaze, and set alight for a crunchy lid that cracked so satisfyingly, I almost yearned for a cigarette. I dutifully set one aside for my loving husband, and took the rest to my dad’s, where we shared them with some very grateful neighbourhood kids. When I got home, the dog had eaten the husband’s. Hubby was less than amused, but Mac seemed very pleased with his ill-gotten treat.
The second batch failed, epically. Burned on the outside, and raw in the middle. Like, so raw, it looked like I’d already filled them with the custard. Of course, this failed batch was the one that actually counted because I made them on his birthday, which happened to fall on a public holiday, so my emergency back up options were extremely limited. Thankfully, Krispy Kreme was open, and the boy was hardly disappointed in being taken there to go nuts. He was thrilled with this contingency, but I was still so, so disappointed. I think I know what I did wrong, and will try again. But, honestly, I’ll probably keep playing around with donut recipes, while keeping the Sugar Hero one handy, because it really was very good.
What I won’t be looking for, however, is another Crème pâtissière recipe. Sugar Hero NAILED it. It was thick, silky, sweet but not tooth-achingly so, vanilla-y and the right level of eggy. It can also be made ahead of time, which is what I had done with the second batch of donuts. I now had a serving of the custard, and no donuts to squirt them into. As it was Easter weekend, and I had another party to attend the next day, I whipped up a Birthday Custard Sponge from Nigella Lawson, and sandwiched it with the Crème pât. It. Was. Heaven.
This particular recipes yields a fair amount of crème pâtissière, but I truly don’t see that being a problem – it’s very versatile. And delicious by itself. If you find you have any left over from whatever you use it for, a spoon is all you’ll need to rectify that little problem. I’m also looking forward to making a traditional crèmebrûlée with it.
I’m not even bothering to look up the calories for this one. It’s too variable – how much of it you eat really depends on what you do with it. Chances are, though, if you’re having a crème pât kind of dessert, you don’t really want to know, anyway.
Ingredients
4yolks
1whole egg
3tbspcornstarch
1/2cupgranulated sugar
2cupsmilk
pinchsalt
2tspvanilla bean pasteor 1 tbsp vanilla extract
2tbspbutter
Method
In a bowl, whisk together the yolks, egg, cornstarch, and 1/4 cup of the sugar, until thick.
In a saucepan, combine the milk, remaining sugar, and salt. Heat the milk over a medium burner until it just starts to boil. Check consistently – if it burns or scalds, you’ll need to start again.
Whisk the egg mixture, slowly drizzling a little hot milk into the bowl as you do. Continue to whisk and drizzle until you’ve added about half of the milk. Keeping the saucepan off the heat, pour the eggs into the milk mixture while whisking continuously.
Return the saucepan to the stove over medium-low heat, whisking constantly. Use a rubber spatula to periodically scrape the bottom of the pan so it doesn’t scorch . Cook until the pastry cream thickens and starts a very gently bubbling, then cook for 1-2 minutes longer. Remove the pan from the heat and whisk in the vanilla bean paste or extract, and butter.
Pour the cream through a wire mesh strainer into a bowl. Use a spatula to help work it through, straining out any clumps of egg that have developed. Press a layer of cling wrap directly on top of the pastry cream to prevent a skin, and let it cool to room temperature. Once at room temperature, refrigerate it until it’s cold, at least 2 hours. This will last 2 days in the fridge.
I’ve been a huge fan of Deb Perelman and Smitten Kitchen for several years now – I’ve never cooked a thing of hers that has not been perfection on a plate. However, while actively losing weight, I found a lot of my favourites were not exactly compatible with my lifestyle, and while I kept a covetous eye on her website and social media, I relied heavily on other sources for recipes.
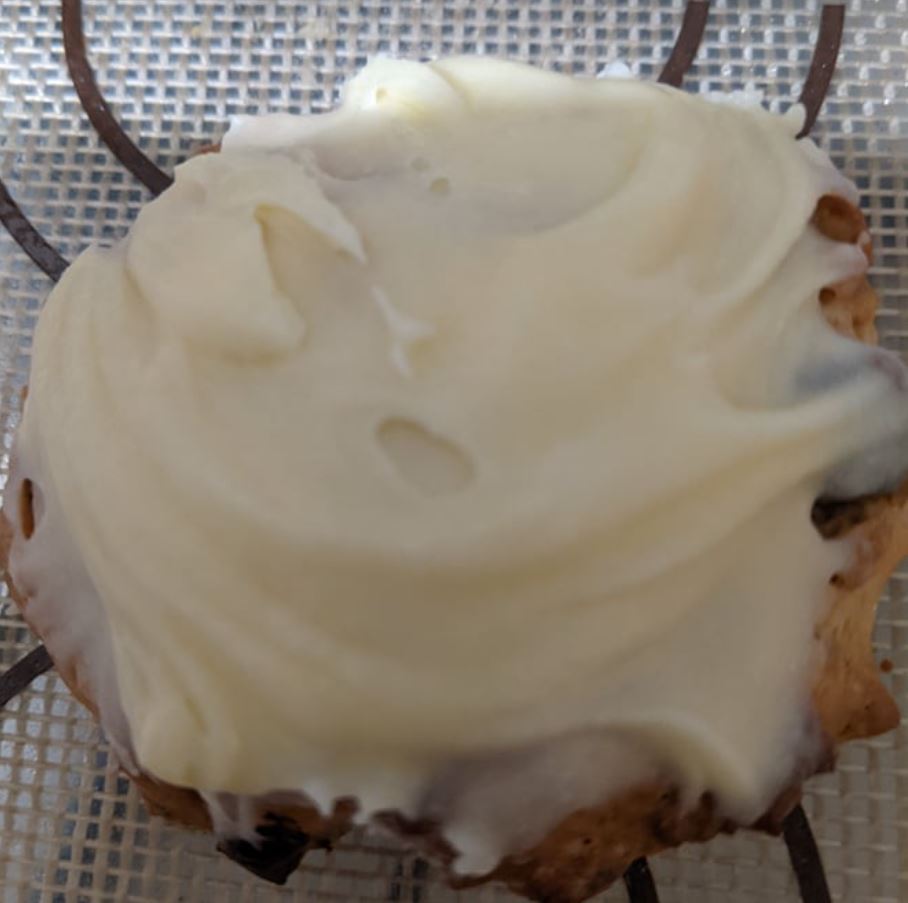
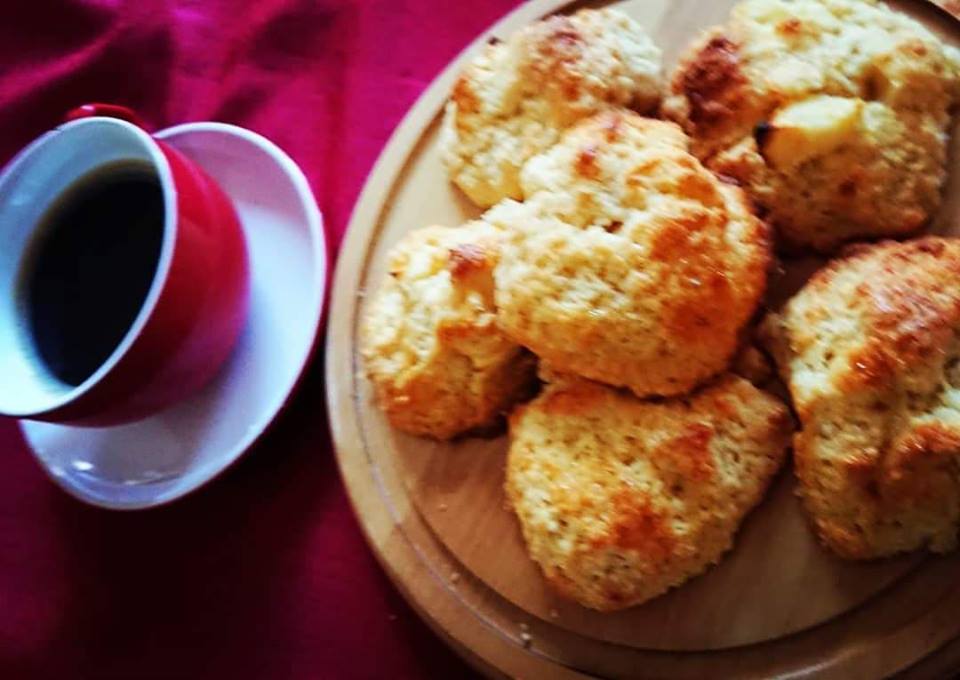
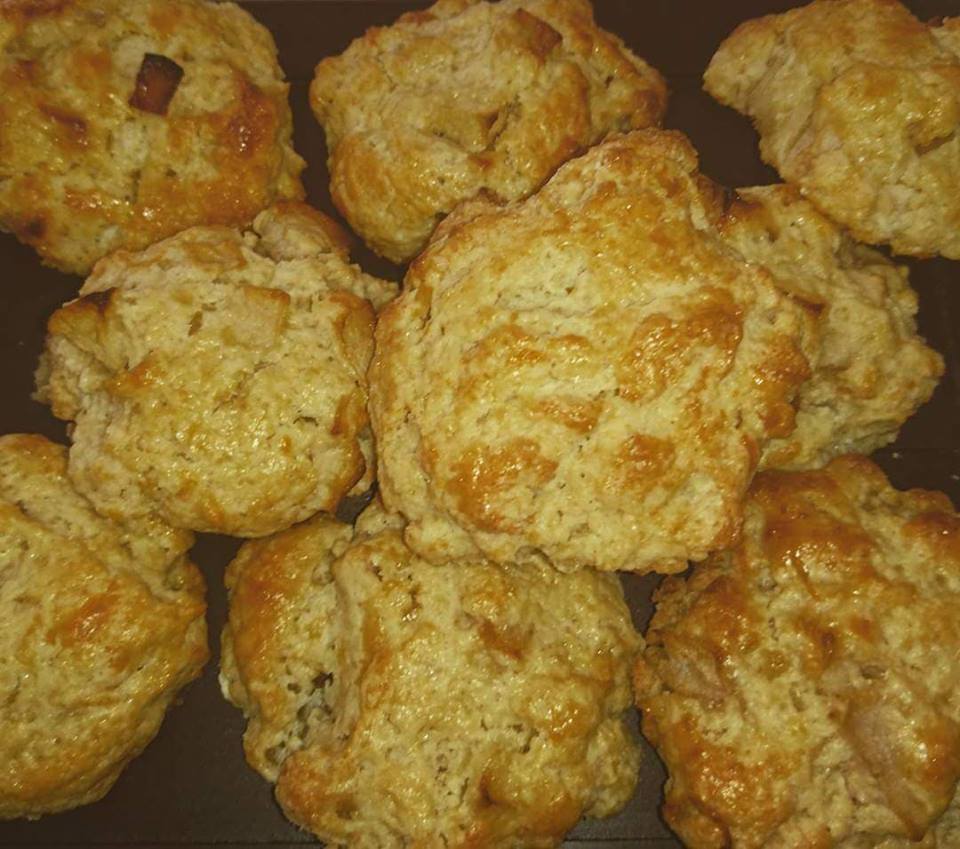
However, now I have a little more wiggle room for treats and more caloric meals, I’m remembering why I’ve spent so many hours trawling her amusing, heartfelt and comfortable blog. Her food is honest and makes you want to share it with those you love the most. (I’m assuming here that other people see cooking as an act of love, but it’s entirely possible I’m just crazy). So yesterday, when the hubby informed me his aunts were coming over for afternoon tea, my second thought (after “yay”, because I totally won the in-law lottery) was “Oooh… SK’s cheese and apple scones!” It’s been a while since I made these, but they were just as amazing as I remembered, even though I don’t follow the recipe exactly. But that’s okay, because SK’s recipe is also an adaptation, and cooking is all about soul, so it stands to reason that each cook will add their personal touch.
These moist little parcels of happiness taste like apple pie, and their slightly salty sweetness hits you right in your soul’s tastebuds. And considering they’re made of cheese, cream and butter (you know… all the good stuff), that’s hardly surprising. What IS surprising is that they only clock in at 197 calories apiece. That’s not too bad considering how decadent they taste. Definitely doable!
Serves 12
Ingredients
2 Granny Smith Apples
1 1/2 cups self raising flour
1/3 cup sugar
85 grams salted butter, cubed
1/2 cup Cracker Barrel Special Reserve, or other extra sharp cheddar
1/4 cup thickened cream
2 eggs
Method
Preheat oven to 200C. Line oven tray with baking paper.
Peel and core apples, and cut into 3 cm chunks. Arrange in a single layer on tray and bake for 10 minutes on the middle rack. Allow to cool for 10 minutes. Reduce temperature to 180C.
Sift flour and sugar together and set aside.
Use beaters of stand mixer with the paddle whip attachment to beat the butter, cheese, cream and one egg until well combined.
Add apple and stir.
Add flour/sugar mixture and and mix until the dough just comes together. Be careful not to overmix.
Sprinkle a small handful of flour on your workspace and and upturn the dough. Use your hands to gently pat until smooth, taking care not to overmix.
Divide dough into 12, and gently pat into flattened balls. Place onto an oven tray lined with a fresh sheet of baking paper. Leave a small space between each scone, as they do spread, but keep them close so that they are pushed upwards for taller scones.
Beat remaining egg in a small bowl. Brush the scones with egg wash. Bake until firm and golden, about 20 minutes. Allow to cool for 10 minutes (as they’re very fragile when hot), then very gently transfer to a wire rack to cool. Like all scones, these are best eaten on the day they are made. Trust me, this is no hardship.
A dear friend on My Fitness Pal once told me, “there’s no point working hard for a better lifestyle if you are too scared of eating to have any lifestyle at all”, and it really struck a chord with me. I love food, and while I’m happy to be strict with my diet and exercise 90% of the time, I really enjoy that 10%, when I can enjoy something decadent or wicked without a care in the world that it puts me past my daily calorie goal, because tomorrow is a new day, and one dessert isn’t going to undo any of my hard work. Even when that dessert is 500 calories and change. No apologies. Totally worth it.
Working with dough or pastry of any sort is always cathartic to me – making something so delightful out of the most basic ingredients is a simple joy that often makes me wish I had the courage and talent to cook for a living (and when I say that, I mean having a career where I’m paid to cook what I want, when I want, which I’m sure is not how any of this works).
There are a million pie recipes out there, and the basis of a lot of your fruit pie recipes are pretty similar. It’s a basic dessert, but really, who doesn’t love pie? It’s an essential recipe to have under your hat, and mine is an amalgamation of so many recipes I’ve come across. Even so, it’s probably exactly the same as somebody else’s, and eerily similar to many more. I can’t even begin to credit all my sources here – it’s a complete mongrel of a recipe. Especially when you start adding different fruits in here. Which work so well, especially if those fruits are apples, just to bulk it up. Actually, this makes for a sensational apple pie if you replace all the fruit with 7 Granny Smith Apples and do everything else exactly as written. In fact, I did exactly this tonight to take to my in-laws’. It’s a winner.
Word of warning – do not try to make this in an Australian Summer. It’s pretty much impossible to work with. This is a pastry that likes to be cold! If the pastry does get a bit warm and unworkable, just stick it back in the fridge for a few minutes, it’s pretty resilient, as long as the room temperature isn’t too high.
Serves 8. Or 4. Who am I to judge?
Ingredients
Pastry
1 1/3 cup plain flour
1/2 cup self raising flour
1/4 cup custard powder
1/4 cup caster sugar
150g butter, chopped
1 egg, beaten
2-3tbs water
2tbs milk
2tbs raw sugar
Filling
50g butter
1/2 cup caster sugar
400g can pitted cherries, drained
400g frozen berries, defrosted
2 Granny Smith apples, peeled, cored and chopped
1tbs lemon juice
1/2 tsp cinnamon
1/2 tsp nutmeg
1/4 tsp ground cloves
Method
Process butter, custard powder, flours and sugar until mixture resembles fine breadcrumbs.
Add egg and 2tbs water. Process until mixture comes together into a ball. If it remains too dry, add extra water and process again.
Turn dough onto a clean, dry surface and knead for 30 seconds until smooth. Flatten into a disc and wrap tightly in cling wrap. Refrigerate for 30 minutes.
Meanwhile, melt butter and sugar for filling in a large saucepan over medium heat. Allow sugar to caramelise a little. Add fruit, lemon juice and spices, and mix well. Cook, stirring occasionally for 10 minutes, or until apples have softened but not collapsed. Remove from heat and allow to cool.
Roll out 2/3 of the pastry between 2 sheets of baking paper so that it is large enough to line base and side of prepared dish (test by ensuring that there is an inch or so around the circumference when you place the dish upside down over the pastry). Rewrap the reserved pastry in cling wrap.
Remove one sheet of baking paper and carefully line the dish with pastry. When it is fitted in, remove the second sheet of paper. Smooth gently with clean hands. Using a sharp, small knife, trim the sides of the dish.Roll excess pastry with the reserved pastry. Allow some slight overhang – the pastry shrinks as it cooks. Refrigerate for 15 minutes.
Preheat oven to 180C and grease a 20cm x 5cm deep pie dish.
Meanwhile, roll out second ball of pastry so that it fits comfortably over the edges of the pie dish (you may have a little excess pastry left over). Cut into strips and press into the edges of the pie base to create a lattice pattern. Conversely, you could just roll the dough large enough to fit over the filling and press into the pastry bae, to make a full a full lid.
Carefully brush pastry lid with milk and sprinkle with sugar. Bake for 45 minutes. Cool for at least 15 minutes before serving with a scoop of vanilla ice cream.