Toblerone Brownies

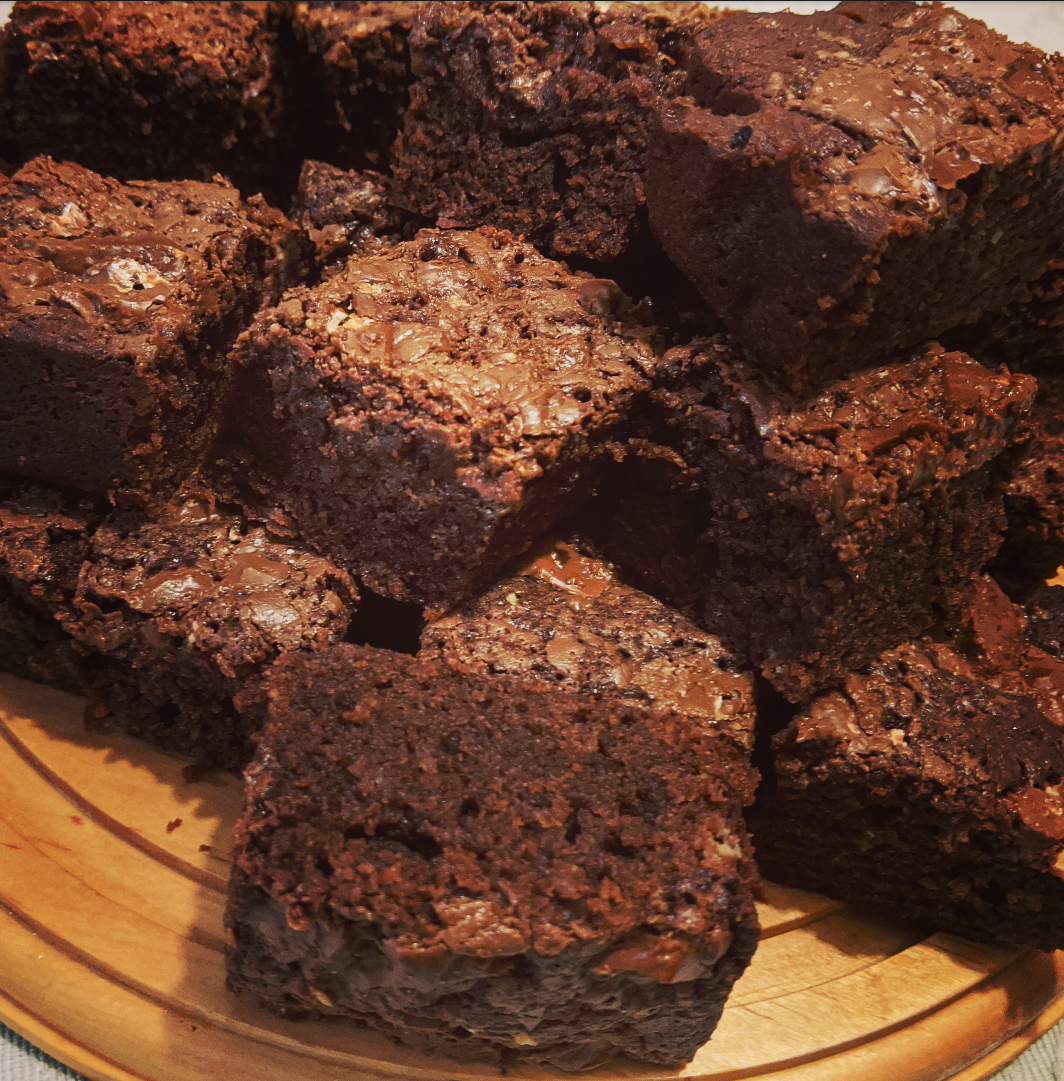
Let’s just get this out of the way – these are NOT for calorie counting days. At over 300 calories a pop, these delicious morsels are the embodiment of a ‘sometimes treat’.

With that being said, there are three different types of chocolate in here, and one of them is Toblerone. They’re rich, dense, and sweet – a small square is really all you need. On the other hand, there are three different types of chocolate in here, and one of them is Toblerone. They’re amazing. And they have the perfect crumb: they’re not especially fudgey, nor are they merely a chocolate cake with a superiority complex. They’re the perfect brownie, and my go-to recipe whenever the occasion calls for something sweet.


I adapted this recipe from the Taste.com, and after much experimenting, settled on this incarnation. The original recipe has a butterscotch-esque icing, but I found that with such a rich brownie, while the icing was delicious, it was seriously overkill. Conversely, without the icing, using all dark chocolate made them too intense (and I say that as a girl who loves her chocolate dark and bitter). But by using an even mix of dark and milk chocolate, we’re left with a well balanced slab of heaven. Words of advice:

a) splurge on good quality chocolate, you truly can taste the difference.

b) Freeze the Toblerone – it makes it SO MUCH EASIER to work with

Ingredients

250g butter, chopped

100g dark chocolate, broken into largeish pieces

100g milk chocolate, broken into largeish pieces

3/4 cup caster sugar

3 eggs

1 1/4 cups plain flour

2 tablespoons self-raising flour

200g Toblerone chocolate, frozen

Method

  1. Preheat oven to 180C. Line base and sides of an 18cm x 28cm slice pan with baking paper, extending paper 2cm above edges of pan. Spray with oil, or grease using butter (I always do the former).
  2. Place butter, dark chocolate, milk chocolate and sugar in a saucepan over low heat. Cook, stirring occasionally until melted and smooth. Remove from heat and rest for 10 minutes to cool slightly.
  3. Crack eggs, 1 at a time, into chocolate, whisking until combined. Sift in both flours, and fold to combine.
  4. Pour mixture into prepared pan. Tumble in the Toblerone pieces and very slightly press into the mixture.
  5. Bake for 25 to 30 minutes . Cool for 1 hour before lifting from pan (lest it fall apart).

Facebooktwitterredditpinterestlinkedinmail

Chorizo, Lentil and Vegetable Soup

When I can’t decide what I want for dinner, or if I’m not particularly hungry, I almost invariably turn to soup. I just love it – especially the broth kinds.

Today was one of those indecisive days – I didn’t have a clue what I wanted, and I wasn’t feeling hungry or inspired, so looking through my (way too many) cookbooks and saved recipes didn’t float my boat.

So I did what never fails – I trawled my My Fitness Pal recipe collection to see what looked good and had a decent amount of calories and macros – basically, I let nutrition make the decision for me. After scrolling for what seemed forever, this recipe, from Smitten Kitchen, jumped out at me when nothing else looked even mildly interesting.

Of course, I had changed everything in it when I put it into MFP months and months ago. No oil instead of 1/3 of a cup of it, Chorizo instead of sausage meat, baby spinach instead of chard, chicken stock instead of water, and I threw in a zucchini, too. I knew the sum of the parts were good, so I just hoped for the best.

Which is exactly what I got. A flavoursome, complex, delicious, nutritious filling and textured soup that had all of us eating in almost complete silence. I made garlic bread using bread rolls I had laying around, and while they were delicious, the soup is more than able to hold its own, too. The servings are generous, too. The recipe yields six servings for 238 calories per serves, and by ‘serves’, I definitely mean ‘full bowls’.

Ingredients

180g chorizo, sliced into small coins

1 onion, diced

2 medium carrots, peeled and diced

2 cloves garlic, finely chopped

400g tin brown lentils, drained and rinsed

800g tinned tomatoes

2 bay leaves

Salt and pepper, to taste

6 cups chicken stock


1 medium zucchini, diced

60g baby spinach

4tbs grated parmesan cheese, to serve

Method

  1. In a large saucepan, cook chorizo over medium-high heat for 5 minutes, until golden.
  2. Lower heat, and add onion, carrots and garlic. Cook, stirring occasionally, for 5 minutes until vegetables have softened.
  3. Stir in lentils, tomatoes and bay leaves, and season well.
  4. Add chicken stock, and bring to the boil. Turn heat down to medium, and simmer for 20 minutes, until lentils are soft but not mushy.
  5. Tumble zucchini into soup and cook for 3 minutes, until zucchini is tender. Add spinach and remove from heat as soon as it wilts (within 30 seconds or so).
  6. Ladle soup into bowls, being careful to remove the bay leaves. Serve with extra pepper and topped with parmesan cheese.

Facebooktwitterredditpinterestlinkedinmail

Vegetable Nuggets

I’ll just come out and say it… Vegetable nuggets > chicken nuggets.

Yeah, you heard me. Not a sentence I was expecting, either. However, not only are they absolutely delicious, they’re packed full of nutrients and are only 40 calories each. Throw 5 or 6 into a container, add a salad and some salsa you’re good to go with a fabulous work lunch in all of 5 seconds flat. And they’re so cheap and easy to make. You probably don’t have to buy a single thing from the store.

I could go on and on. Suffice to say, these are awesome. Which is a pleasant surprise, because while I was cooking them, I was sure they’d be a disaster. I got the recipe from Taste.com, but found the mixture too wet to roll in egg and breadcrumbs, so I just dumped them into the mixture, and then I worried that they’d fall apart while frying in oil, so I baked them first, then finished them off in a nonstick frypan. Bonus: they’re healthier this way!

This recipe yields 30 nuggets, but I think they’d be great as larger rissoles, too. Maybe as veggie burger patties?

Ingredients

1 brown onion, peeled

1 zucchini, trimmed

1 carrot, peeled and trimmed

2 x 400g can cannellini beans, rinsed, drained

35g Mexican style cheese

1 egg, beaten

1 3/4 cups dried breadcrumbs

Salt and pepper to taste.

Method

  1. Preheat oven to 180°C. Lightly spray two baking trays with oil.
  2. In a food processor, pulse zucchini, carrot and onion until finely chopped. Scrape into a large mixing bowl.
  3. Pulse beans and add to vegetable mixture. Add cheese, egg and breadcrumbs, and season well. Mix to combine.
  4. Roll mixture into 30 balls, place on trays, and bake for 20 minutes. Remove from trays and allow to cool and firm up.
  5. Heat a non-stick pan over medium-high heat. Spray with oil. Add half the balls and fry until golden brown. Remove from pan and repeat with second half. Allow to cool.
  6. Serve with salsa and salad.
Facebooktwitterredditpinterestlinkedinmail

Japanese Curry

Once again, dinner at my house was ascertained by the husband watching TV characters eat something, then looking at me with a half sly, half sheepish grin that absolutely means “hey… you could make that for us!” i KNOW that this is what this smile means, because the worlds usually tumble out of his mouth shortly after the grin spreads across it.

So, props to whatever show had the characters eating a Japanese curry. Actually… I think it might have been a Youtube video of some sort. At any rate, I spent the next hour or so hunting down a good recipe. Which was challenging, because while I have certainly eaten more than my fair share of Japanese food, and a moderate amount of curries, I don’t believe I’d ever had a Japanese curry. So evaluating it was tricky. What sold me on this recipe from Just One Cookbook was that while Nami assures us that we can use store bought curry roux (many sites insist that it’s the done thing), she also provides a fabulous recipe to make it from scratch. The whole dish was out of this world: the sweetness of the apples and honey is perfectly balanced with the heat of the other spices, and made my house smell nothing less than divine. Of course, I’ll keep researching Japanese curries (for science), but I could not be more pleased with this one. The whole family gobbled it up, and as is so often the case with curries, the leftovers the next day were possibly even better than when freshly cooked.

Honestly, I didn’t change much with this recipe. I just wanted to put it all together in one place for ease of reference. Because of the potatoes, rice is unnecessary (but not altogether unwelcome), and one fifth of the recipe is only 396 – very respectable for such a flavour bomb!

Ingredients

Roux:
3 Tbsp butter

4 tbsp flour

3tsp curry powder (6 g)

2tsp turmeric

1 Tbsp garam masala

¼ tsp cayenne pepper

Curry

  • 600g boneless skinless chicken thighs, cut into bite sized pieces
  • 1 pinch maldon salt flakes
  • Freshly ground black pepper
  • 2 carrots, diced
  • 2 onions, diced
  • 2 medium waxy potatoes, peeled and cut into bite sized pieces
  • ½ tbsp minced ginger
  • 2 cloves garlic
  • 1½ tbsp olive oil
  • 4 cups good quality chicken stock
  • 1 red apple
  • 1 Tbsp honey
  • 1 1/2 tbs soy sauce
  • 1 Tbsp ketchup
  • Rice to serve (optional, not included in calorie calculation)

Method

To make the roux:

Melt butter over low heat. Add flour, and using a rubber spatula, cook for 10 minutes, stirring regularly to prevent roux from catching. When roux is browned and bubbling, add the spices and cook for 30 seconds. Remove from heat and set aside until step 7

To make the curry:

  1. Soak the potatoes in warm water while making the roux, or for at least 15 minutes.
  2. Season chicken with salt and pepper and set aside until step 5
  3. Heat oil over low heat and sweat the onions and carrots for five minutes. Add onions and garlic, and cook for 30 seconds.
  4. Add the chicken, and brown all over.
  5. Pour the stock over the chicken. Bring to the boil.
  6. Peel the apple (discarding the skin) and grate directly into the broth. Stir in honey and potatoes and simmer for a 15 minutes, or until potatoes are tender but not mushy.
  7. Incorporate a ladleful or two into the reserved roux, and stir until it is a smooth paste. Spoon the roux into the stock, and stir to combine.
  8. Add soy sauce and ketchup. Simmer, uncovered, for 10 minutes or so, until the curry becomes thick.
  9. Serve with rice if using, and steamed vegetables.
Facebooktwitterredditpinterestlinkedinmail

Pea and Barley Salad

The number of cookbooks in my house is nothing short of ridiculous – and yet, they continue to grow despite occasionally finding one that I don’t remember ever buying or reading. Once I get over the guilt, it’s like nerdy foodie Christmas.

The other day, my son found some such gem hidden in with the rarely touched board games. The Healthy Life Cookbook, probably purchased well before I really cared about such things, was covered in a thin layer of dust – I swear I don’t remember how or when it got into my house. But, with renewed enthusiasm, I pored over the recipes, and stopped dead in my tracks at this one. Barley? Feta cheese? Spinach? I’m in!


At 311 calories for a hearty serve (this recipe yields 4 serves), it’s filling enough for a light dinner, and absolutely perfect for a work lunch. I did learn the hard way, however, to sprinkle the cheese on as you go if you plan on it lasting more than two days (it really doesn’t last much longer than that anyway, but you don’t need slimy feta ruining your Tuesday). Sounds obvious as hell now, but oh well… live and learn.

Ingredients

2 cups vegetable stock

250g frozen peas

3 radishes, diced

40g baby spinach

1/2 cup raw pearl barley

70g Greek feta

Dressing

1tbs olive oil

2tbs red wine vinegar

2tsp dried mint

1 clove minced garlic

Black pepper, to serve

Method

  1. Bring stock to boil over a high heat in a medium saucepain. Boil peas for 4 minutes or until tender. Remove with a slotted spoon and combine with radishes.
  2. Add barley to the stock, reduce heat to medium low, and simmer for 40 minutes or until barley is tender and stock has been absorbed.
  3. Whisk together the ingredients for the dressing and set aside.
  4. Remove pan from heat. Stir in radishes, baby spinach and peas, then add the dressing. Crumble feta over the salad and season with generous cracks of black pepper.

Facebooktwitterredditpinterestlinkedinmail

Dal Makhani

Weeknights are such a balancing act – I won’t bore you with the laundry list of things that need to be done (including the actual laundry), but like every one else, there’s always something that needs to be done, or somewhere we need to be. Between myself, two active kids, an active dog, and a husband who works long hours with a long commute, you can usually find me from the hours of 4-8pm Monday-Friday in some degree of hectic rush. Now, I’m not complaining, not really. I’m grateful to have a job I love, even if it doesn’t always “finish at 3” (ugh). I’m grateful that my kids are active and social, and have found sports and activities that they love, and that hubby and I are in a position to let them explore those interests. I’m grateful to have a puppy I adore, and that we can both exercise together – I don’t know who enjoys his walkies more, McCartney or me. Actually… probably Mac; I don’t recall peeing in excitement over the prospect. And I’m incredibly grateful to be married to a wonderful man who works hard and makes a lot of sacrifices for the wellbeing of our family.

But, man, dinner time can be a challenge. I’ve taken to cooking dinner the night before the more hectic nights, and so I’m constantly on the look out for meals that keep really well, are nutritious and delicious, and are quick/easy to make in the first place, because often, these make ahead meals are the second dinner I’ve cooked that night, after a busy day of work/kid wrangling. Once again, I find myself very grateful that my kids aren’t fussy eaters… I’d go mad if the options were limited even further!

This dal recipe ticks almost all my boxes – it’s healthy, cheap, easy, and it doesn’t just keep well… it’s better the next day! It’s not exactly quick, but that’s only because it simmers away for an hour – it does it’s own thing on a low heat, and needs very little attention (the bare minimum of stove safety ought to cover it), so it’s definitely easy. It’s probably not the most authentic dal – the recipe from which I adapted it is, but I changed it to be quicker and more straight forward, because that’s what I need it to be. So please forgive the tinned beans and commercial chapatis… the aim of the game is to be nourished and warmed quickly and without delay – fiddling around making my own bread isn’t possible on dal day! But what it lacks in authenticity, it makes up for in rich taste. I was surprised at the nutritional breakdown: despite two different types of butter and some cream, it only clocks in at 335 calories per serve, which leaves just enough room for you to justify the chapati, because at least in my view, carbs are life.

Serves 4

Ingredients

1 tbs ghee

2 tbs butter

1 brown onion, diced

1/2 cup passata

1 clove garlic, minced

2 tsp minced ginger

400g can lentils, rinsed and drained

400g can red kidney beans, rinsed and drained

1/2 tsp garam masala

1/2 tsp ground chilli (I used cayenne)

1/2 tsp ground cumin

1 pinch Maldon salt flakes

1.5 cups water

1/4 cup Philadelphia light cream for cooking

1tbs butter, extra

Method

  1. Melt ghee and 2tbs butter in a large heavy based saucepan over medium heat. Add onions and cook for 10 minutes until golden brown.
  2. Add ginger and garlic, and stir for 1 minute, until fragrant.
  3. Mix in the passata and stir until it is fully combined.
  4. Stir in the lentils and kidney beans – it’s okay if some of them are mashed into the sauce.
  5. Add spices, stir well.
  6. Pour in 1/2 cup of water, and stir. Reduce heat to low, and simmer (uncovered) for 45 minutes. Stir every 10 minutes or so to prevent sticking. Add the remaining water in increments throughout the simmering time – I added a quarter cup every time I stirred.
  7. After the dal has simmered for 45 minutes, stir in sugar, cream and another tablespoon of butter. Stir to combine, and simmer for a further 10 minutes. Serve immediately with rice and chapati (neither are counted in the calorie calculation – I skip the rice altogether) or allow to cool, then refrigerate and let the flavours do their thing.

Facebooktwitterredditpinterestlinkedinmail

Butter Bean and Spinach Smash

Image may contain: food

I never thought I’d be the kind of person to own a book called “The Detox Bible”. I don’t believe in detox diets – namely because I feel our bodies are perfectly capable of doing all the detoxification that they need, and don’t need magical juices or powders to help them along. I also don’t believe in “bad” foods that must be avoided at all costs, unless of course, you have an allergy. Nevertheless, when a local bookshop was having a sale on cookbooks and slashing prices by 75%, I’m willing to be more open to things.

I have to say, this book pleasantly surprised me. It’s wheat, refined sugar and dairy free (all of which I happily ignore when it suits me), but really, it’s pretty well balanced. It’s more often a case that these recipes are naturally free of these devil ingredients, than a case of the authors moving heaven and earth to swap these perfectly fine ingredients with ridiculous substitutions. I appreciate such common sense approaches, even if I don’t subscribe to the core philosophy.

Anyway, I digress. This dip is why I bought the book. It’s the first page I opened to when I was flicking through it at the store, and I was immediately sold. I love beans. Like, LOVE beans. My family aren’t quite as enthusiastic, so while I use them regularly, I rarely make them the star of the dish… Until now. Combined with an array of crudités, this dip makes an extremely healthy, delicious, filling and cheap work lunch that will make you feel like some kind of nutritionally superior god/dess for only 240 calories (it’s 170 by itself). Did I mention it’s delicious?! Because, seriously, even I was taken aback with just how GOOD this is. Off a spoon, with crackers, as a bed for your egg – it just works with everything, and my new addiction.

Serves 2

Ingredients

2 handfuls of baby spinach (about 25g)

400g butter beans, drained and rinsed (butter beans are lima beans – I had no idea!)

1tsp olive oil

1tbs lime juice

Salt and pepper to taste

1 cup chopped raw vegetables to serve

Method

  1. Place all ingredients except the crudités into a blender and pulse into a chunky consistency (you can make it completely smooth if you prefer. I like it chunky – the butter beans are creamy enough to provide a lovely texture). If it won’t break down, add a teaspoon of water to help it along.
  2. That’s it. It couldn’t be easier.

Facebooktwitterredditpinterestlinkedinmail

Cream Cheese Snickerdoodles

It’s a tragic truth that here in Australia, snickerdoodles are not readily available. I don’t think I’ve ever been in a store and seen a pack, or heard anyone casually speak of them. If not for the fact that American pop culture is ubiquitous, and the name sticks in your head (or, at least, it does if you have the sense of humour of a 12 year old boy), they’d be an unknown entity to me.

I remember once, when I was first trying my hand at cooking, making some sort of snickerdoodle slice recipe that I’d seen online, and by which I been thoroughly underwhelmed. Experience tells me now that I hadn’t completely cooked the flour out of the batter, which would account for the unpleasant aftertaste, but I still remained vehemently uncurious about these funnily named little snacks. I hadn’t thought about them for years, save for the occasional time they were mentioned in an American movie or show.

The day after Mother’s Day, I found I had a glut of cream cheese left over, and no inspiration for to do with it – not even a stale bagel, nothing. So, I figured I’d do some cream cheese cookies… because what’s life without a little naughtiness, right? It wasn’t until I’d made, eaten, and thoroughly enjoyed these cookies, adapted from This Silly Girl’s Kitchen, that I realised they were, essentially, a somewhat decadent snickerdoodle. Now I get the hype, because these are the best cookies I’ve ever eaten. They’re so fluffy and cake-like, they melt in your mouth, and are sweet without being too sweet. I could eat them all day. Of course, they’re 165 calories per (not huge) cookie, so they’re a special treat, but oh, my, what a treat they are!

This recipe yields 28 cookies.

Ingredients

1/2 cup  butter, softened

125g cream cheese, softened

1 & 1/2 cup icing sugar

1 egg

1 teaspoon vanilla extract

Small pinch Maldon salt flakes

1 & 3/4 cup self raising flour

1/4 cup white sugar

1 tablespoon ground cinnamon

Method

  1. Using a stand or electric mixer, cream the butter and cream cheese until smooth. Gradually add the icing sugar until combined.
  2. Add egg, baking powder, vanilla, and salt. Mix to combine.
  3. Slowly incorporate flour, scraping the sides as needed. Refrigerate for one hour.
  4. Preheat oven to 180 degrees, and line two baking trays with non-stick baking paper.
  5. In a small bowl, mix together the cinnamon and sugar.
  6. Roll 2 teaspoons of dough into small balls, Roll each ball into the cinnamon sugar mixture to fully coat, and place on the trays about 5cm apart – they do spread a bit. Flatten slightly.
  7. Bake for 8-9 minutes, until just set. Be aware that these are a very blonde cookie, and won’t brown much, so don’t overcook. Let cool on baking sheet for 10 minutes (if, after this, they still seem undercooked, place back in hot oven for another two minutes or so). Transfer cookies to a wire rack and cool completely.
Facebooktwitterredditpinterestlinkedinmail

Beef and Barley Stew

Oh, look. Another barley recipe! I don’t actually eat a lot of barley, but I absolutely adore it, and am always so excited to find low-calorie, delicious recipes with what is, hands down, my favourite grain.

Strangely enough, it’s never really occurred to me to cook it in my cast iron pot… I’m usually the goose standing in front of the stove for forty minutes at a time, stirring and adding bits of water at a time to stop it from sticking to the pan. Oh, sure, it’s a labour of love well worth the final result, but frankly, sticking it in the oven with slightly more water than I’d normally use is even better.

The combination of chilli and craisins is an absolute winner here, and lends to a sweet and spicy combo that really keeps things interesting. I know slow-cooking rump steak isn’t really the done thing, but I took the risk in hopes of keeping the recipe as low-cal as possible, and it worked. At 423 cals for a good-sized bowl, this stew is perfect for cooking the night before, ready to nourish and warm you up after a wintery evening of schlepping the kids to their various sporting commitments.

Serves 5

Ingredients

3 tsp olive oil

500g beef rump (don’t trim the fat), cubed

2 cloves garlic

1 onion, diced

3 carrots, diced

2-3 tsp Masterfood minced chilli

400g tinned tomatoes

1 1/2 cups beef stock

1 cup pearl barley

1/2 cup craisins

parsley, to serve

Method

  1. Preheat oven to 160C. In a cast iron or other oven-safe pot with a tight lid, heat half the oil over medium-high heat on the stove, and brown the beef in batches and set aside.
  2. Heat remaining oil over low heat. Add onion and carrots, and cook for 10 minutes, until softened. Stir in garlic and chilli, and mix for 1 minute to combine.
  3. Add beef, tomatoes and stock, and bring to a simmer. Transfer to oven and cook for 1 hour.
  4. Add barley and craisins, and bake for another hour, stirring occasionally to avoid the barley from sticking. Top with another half cup of water as you go, if necessary. (I found I don’t need to, but ovens are fickle and yours may vary).
  5. Either serve immediately, or allow to come to room temperature and then refrigerate. Reheat gently over a medium heat, topping with more water/stock if you find it dries out as it reheats. Garnish with parsley to serve.

Facebooktwitterredditpinterestlinkedinmail

Baked Sweet Potato with Burghul Chilli

Every now and then I think about vegetarianism. I think I’d be good at it. There are SO many good vegetarian dishes that highlight amazing ingredients rather than try to compensate for the lack of meat, and I appreciate that greatly. However, at the end of the day, I enjoy eating meat (although I don’t need to eat it every day) and don’t believe in completely cutting out entire food groups from my diet ( I have no issue at all if you do, I just don’t want to, for various reasons). In saying that, I don’t miss meat at all when I have a great veg meal, and I find myself having more of them lately. I seem to find myself creating delicious vegetarian lunches to take to work, because then my hubby and kids aren’t being forced into anything, I don’t need to worry about balancing nutrients for anyone except myself (which I already do anyway), and I’m cutting down on unnecessary meat, without making any massive changes. I guess I’m coming across a totally uncommitted, fake, wannabe vegetarian, and I’m absolutely okay with that. I’m not any those things, really, least of all a vegetarian; I just love vegetables and experimenting with both cooking and eating, and this seems to be my thing du jour. I think I’ve struck a good balance. I hope so. I can’t say there have been any negative effects since reducing the extraneous meat consumption, and I’m still getting adequate levels of quality protein. Win win!

This vegetarian chili, adapted from The Women’s Weekly’s Eat Well With Wholefoods, is the perfect example of a completely whole meal in and of itself, that is delicious, filling, and complex in flavours and textures. It makes the perfect at-work lunch or light dinner, and at only 304 calories a serve, nobody would blame you if you popped a drained can of tuna in there to bulk it up a bit and/or satisfy the carnivores in your pack. Honestly, though, it doesn’t really need it – it’s filling and hearty just as it is. Conversely, if instead of being a fake vegetarian, you wanted to go the other way and make it vegan, all you need to do is omit the yoghurt. Talk about a crowd pleaser!

Serves 2

Ingredients

Spray oil, or 3 tsp of olive oil

300g sweet potato, cut into large cubes

1 brown onion, diced

1 medium carrot, diced

1 clove garlic

1 tsp minced ginger

1 tsp ground cumin

1/2 tsp cayenne pepper

1 tsp paprika

1 can diced tomatoes

50g burghul

salt and pepper to taste

4 tbs natural yoghurt (I use Danone yopro – high protein, no sugar, thick and creamy)

Dried parsley to serve.

Method

  1. Preheat oven to 200C. Arrange sweet potato on baking tray and spray/drizzle with 2 tsp of the oil. Roast for 45 minutes.
  2. Meanwhile, heat remaining oil in a saucepan over medium-low heat. Reduce heat to low and cook onion and carrot for 10 minutes.
  3. Add all the spices, and stir until combined and aromatic, about 1 minute.
  4. Pour in tomatoes and cook for about 5 minutes. Add burghul and cook for five minutes, stirring occasionally. Season and remove from heat.
  5. Tumble sweet potatoes on to two plates. Spoon the chilli over the vegetables, and top with yoghurt and parsley to serve.

Facebooktwitterredditpinterestlinkedinmail