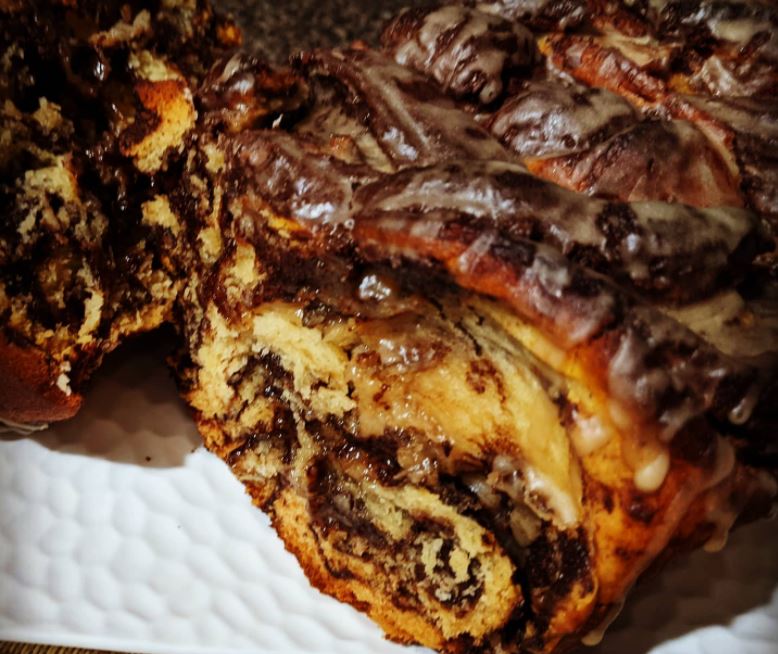
Mocha Pfeffernüsse bread

Chocolate – check

Pfeffernüsse spice – check

Coffee – check

Bread – check

With all the good things in life checked off here, it’s of little wonder that this bread is sooooo good! It makes for an awesomely decadent treat (breakfast?) with a latte, and makes the whole house smell like heaven
before you even pop it in the oven. I’ve missed baking so much (stupid busy lifestyle!), and this was the perfect way to get back into the swing of it. It was inspired by the Spiced Choc Coffee Loaf in the Woolworths Fresh magazine, and the fact that while I’d run out of mixed spice, I’ve got a whole stash of pfeffernüsse spice in my kitchen. I haven’t made the original, but my spice mix brings so much to the party that I won’t be omitting it.

The caveat is that it’s, um, nearly 500 calories a slice. But it’s legitimately bread, not cake, and although decadent, it is also filling. And it’s certainly a special occasion kind of recipe, so it’s not like you’d be adding it to your regular diet. And if you are, I kind of envy you!

Ingredients

Dough

3/4 cup milk

7g sachet yeast

1/3 cup caster sugar

3 1/3 cups plain flour

3 eggs, beaten

125g butter (I use salted – if yours is unsalted, add 1/2 tsp sea salt flakes), cubed

Filling

250g dark chocolate

50g butter

1/2 cup packed brown sugar

1tbs pfeffernüsse spice

Icing

30 mls espresso (I used Nespresso Vanilio)

1 1/2 cups icing sugar

Method

  1. Combine milk, yeast and sugar, and rest for 10 minutes.
  2. Place yeast mixture, flour and eggs into a bowl. Knead for 3 minutes until smooth (or 3 minutes in a stand mixer).
  3. While continuing to knead, add butter one piece at a time, incorporating each into the dough before adding another. Knead for 10 minutes after the final piece, until smooth, glossy and elastic.
  4. Place dough in a clean bowl. Cover with a clean tea towel and allow to rise for 1 hour, or up to 24 hours.
  5. Preheat oven to 200°C and line a loaf pan with greased baking paper.  
  6. Melt chocolate and butter, and add sugar and spice mix. Stir to combine.
  7. Divide dough in half. On a lightly floured surface, roll each half into a 35x40cm rectangle. Spread with chocolate mixture and roll into logs from the short edges.
  8. Cut each log lengthways (use a very sharp knife for this or it will tear the dough). Twist two halves into one log, and then repeat with the remaining two logs.
  9. Plait the two twisted logs into one large log and fold the edges underneath. Fit into the loaf pan, squishing the edges in if necessary, but aiming not to lose the twisted appearance.
  10. Bake for 45 minutes. Stand for 15 minutes then remove from pan.
  11. Combine the icing ingredients and drizzle over the loaf.

Facebooktwitterredditpinterestlinkedinmail

Pfeffernüsse

Growing up, one of the memories I have of staying with a Great Aunty was drinking tea and eating iced biscuits whose name I didn’t know. I only ever ate these biscuits at this one Aunty’s house, and I thought they were so very special. It was only when I was much older – well into my twenties – that I found them in the supermarket. Pfeffernüsse, that was them! And they were only a dollar a bag! I immediately brought some, and my dad and I agreed that these were the biscuits we both remembered.

Then I got a wild idea last year that I should make them myself. I came across The Daring Gourmet’s Best Authentic Pfeffernüsse, and she is not exaggerating! They’re so good that my daughter begged for a pfeffernüsse tower instead of a birthday cake this March, despite my insistence that these should be saved for December so they stay special. Everyone seems to love them, and even though most people won’t tell you to your face if they don’t love your cooking, they seem pretty enthusiastic about this recipe. I’ve tried a few other recipes, for science, but none of them come even close to these. I won’t take any credit for these beautiful gingerbread cookies, because I barely deviate from the original recipe, but I do find the website a little unwieldly, especially juggling two pages for the biscuit and the spice mix, so I’m putting it all together, here.

The spice mix recipe makes enough for at least two batches of
pfeffernüsse, but it lasts a long time in a dark cupboard, and you’ll probably be reaching for it a few times, so go to town! The recipe takes a bit of forethought and planning, so having the spices ready to go makes life a lot easier.

Calories? Well, technically 150 per pfeffernüsse, but I’m yet to meet the person who can stop at one.


Pfeffernüsse Spice

Ingredients

2 1/2 tablespoons ground cinnamon

2 teaspoon ground cloves

1/2 teaspoon ground allspice

1/2 teaspoon ground coriander

1/2 teaspoon ground cardamom

1/2 teaspoon ground ginger

1 star anise, ground

1/4 teaspoon ground mace

1/4 teaspoon ground nutmeg

Method

  1. If purchasing spices already ground, combine all ingredients in a cool, dark cupboard for up to 12 months. If your spices are whole, use a grinder or mortar and pestle (I’ve even resorted to a ramekin and a wooden rolling pin) to grind them as fine as possible. Discard any woody bits of star anise that don’t grind enough.


Pfeffernüsse

Ingredients

2 1/4 cups self raising flour

1/4 teaspoon salt

3-4 teaspoons pfeffernüsse spice

1/4 teaspoon finely ground white pepper

1/4 cup almond meal

1/2 cup packed brown sugar

1/3 cup honey

5 tablespoons butter

3 tablespoons thickened cream

1 large egg

For the Glaze:

2 1/2 cups icing sugar

1tsp vanilla essence

3 tablespoons hot water

Food colouring (optional – white is traditional)

Method

  1. In a mixing bowl, combine the flour, salt, pfeffernüsse spice, white pepper and almond meal. Stir well.
  2. In a small saucepan, combine brown sugar, honey, butter and cream. Melt over medium heat until smooth and combined. Cool slightly, about 5 minutes.
  3. Pour melted butter mixture into dry ingredients and beat until very well combined. Add egg, and stir until the mixture is completely combined and has a nice shine. It will seem very wet and sticky – it dries out as it rests.
  4. Tear off a large piece of cling film and double wrap, very tightly. Refrigerate overnight, or for up to 48 hours.
  5. Preheat the oven to 180°C and line two baking trays with baking paper.
  6. Remove dough from fridge and roll two teaspoons worth into balls, placing 2-3 cm apart, as they do spread a little. Bake for about 15 minutes: they should be firm but not hard or darkened.
  7. Remove from oven and allow to cool completely.
  8. Combine the ingredients for the glaze in a bowl and mix to combine. You want the consistency to be thick enough to hold on, but not so thick as to rip the fragile biscuit.
  9. Dip each biscuit into the glaze, place on a wire rack with baking paper underneath, and allow to set completely.

Facebooktwitterredditpinterestlinkedinmail

Plum and Red Wine Lamb Shanks

Every school holidays, I spend a fair bit of time with my dad, and one of the little things we do together is go to nice cafe in Windsor (Simon’s), hit up the lolly store opposite while Dad has a conniption over the price of old fashioned sweets that he loved as a kid and bought with currency that was removed from circulation in 1966, then drive up to M & A Butchery in Wilberforce to buy meat while Dad has a conniption over me doing things like spending $20 on a rabbit to cook “for fun”, when he was forced to eat it as a child due to being so poor. I’m not too sure how or when this tradition came to be, but I really do treasure it so.

An extension of this tradition is that I buy and cook lamb shanks on “abattoir day”, largely because the shanks from this place are large, meaty and relatively cheap, unlike what I usually see in the supermarket. I have many recipes for shanks due to a number of old cookbooks that say infuriating things like “try lamb shanks for a cheap and tasty meal”, which pairs beautifully with my dad’s third conniption of the trip: “I can’t believe the price! I used to feed these to Jedda (a dog who died long before my birth) because they were so cheap!” This plum and wine recipe, however, is the Official Family Shank – a firm favourite by far. The sweetness of the jam complements the richness of the lamb, and the peppery undertones bring it all together. Which brings me to the wine: I prefer to use a shiraz, to cut through the sweet, but have made it with several types of wine, and never had a bad experience. Whatever you do, make it a good one, because you really can taste it. It’s worthy of a decent wine, anyway. It’s a crowd pleaser (although for economics, it’d best be a small crowd!) and I often pull it out for dinner guests, and occasions like Quarant-Easter, which was spent in lockdown but still deserved a little pomp and circumstance. I tried to work out the calories, but there are a lot of variables: the size of shanks aren’t standardised and you don’t actually consume all of the sauce, so the best I can come up with, is that with mash and veg, you probably are eating about 700 calories. Not an everyday dish, that’s for sure, but not too bad for a special treat.

Oh, and the leftovers. The best sammich I’ve ever had. Seriously.

Ingredients

4 Frenched lamb shanks

4tbs flour

2 tbs olive oil

1 onion, thinly sliced

1tsp dried rosemary leaves

1tsp dried thyme leaves

1 cup red wine

1 1/2 cup chicken stock

2tbs worcestershire sauce

1 cup plum jam

Pepper, to taste

Mashed potato and steamed veggies, to serve

Method

  1. Preheat oven to 160C.
  2. Dust shanks with flour, and shake off excess.
  3. Heat 1tbs oil in a large, flameproof casserole dish over medium heat. In batches (depending on size of shanks and dish), brown shanks all over, and transfer to a plate.
  4. Heat remaining oil and cook onions for five minutes, until translucent. Add wine and bring to boil. Add stock, herbs, jam, worcestershire sauce, and pepper (generously), and cook for one minute.
  5. Return shanks to the dish. Cover and transfer to oven. Cook for one hour. Remove from oven, baste, and continue cooking uncovered for 30 minutes.
  6. Serve with mashed potatoes and vegetables.

Facebooktwitterredditpinterestlinkedinmail

Crab Cake Eggs Benny

My eldest turns 12 today. Crazy.

He’s always angling for that next seafood meal, so I made him crab cakes, poached eggs and hollandaise sauce for breakfast. A worthy birthday breakfast for my favourite little foodie.

But kids always have that knack of keeping you humble, right?

“It’s okay that you didn’t make the English muffins from scratch this time, you’re still a good mum.”

Thanks, dude.

Despite the glaring failure of store bough English muffins, the rest was seriously good. And because all the components came from a range of sources, I’m collating them here for next time. Something tells me there will be a next time. Probably 365 days from now.

I’m not even thinking about calories here. It’s not an everyday kind of breakfast, so let’s just leave it “many”.

Aside from resting the crab cakes for 30 minutes, this only takes about 15 minutes of active cooking time, and can easily be coordinated together (even for me… and I usually hate cooking breakfast because I freak about the timing). Might I suggest:

  1. Prepare the crabcakes and rest in the fridge
  2. After 30 minutes, heat the pans for crabcakes, eggs and hollandaise – remember, you want the crab cakes pan hot and the other two just at a simmer.
  3. Steps 1-3 of Hollandaise
  4. Fry the crab cakes, while still stirring the hollandaise
  5. Pop the crab cakes in the oven
  6. Step 4 of the hollandaise
  7. Between stirs of the hollandaise, poach your eggs
  8. Remove sauce from heat – steps 5-6 – and toast your muffins
  9. Assemble

Serves 4 

Ingredients

Crab cakes

450g crab meat (from a can is fine, if like me, you didn’t win the lotto last night)

2tbs mayonnaise

1 egg, beaten

4tbs dried breadcrumbs

1tbs sweet chilli sauce

2tsp dried parsley

1tsp dijon

salt and pepper, to taste

2tsp olive oil

hollandaise sauce

2 egg yolks

1.5tsp cold water

1.5tsp lemon juice

100g butter, melted

salt and pepper

pinch cayenne pepper

poached eggs

Water, to come up a few inches in a wide pan

2tbs white vinegar

4 eggs

2 English muffins, split, toasted and buttered, to serve

Method – Crab Cakes

  1. Drain crab meat (if canned), and place in a large bowl.
  2. In a separate bowl, mix all other ingredients except for oil. Gently fold into the crab meat, being careful not to overmix.
  3. Shape into four flat patties. Mixture will be a little wet. Refrigerate for 30 minutes to firm up a bit.
  4. Preheat oven to 180C.
  5. On the stove, heat oil in an oven-safe frypan over medium-high heat. While you’re at it, start simmering the water for the eggs and the water in the double boiler for the hollandaise.
  6. Carefully transfer crab cakes to pan and fry for 2 minutes, until the underside is golden. Very gently (honestly, they’re a bit fragile) turn and cook for a further two minutes. Should one break a little when you turn it, you will be able to reshape it.
  7. Transfer the pan to the oven and cook for about 10 minutes, while you make the rest of the components.

Method- Hollandaise Sauce

  1. In the top bowl of a double boiler (off the heat), whisk the yolks, water and lemon juice until pale and frothy. Actually, I use a rubber spatula, rather than a whisk because I hate the sound of metal on metal, so pick your weapon.
  2. Set the bowl over the base, with 2.5 inches of water simmering (definitely not boiling!) over low heat.
  3. Stir constantly and vigorously over this low heat for two minutes. (If the eggs start to scramble, immediately place them over a bowl of very cold water and continue to whisk the lumps out. Strain the eggs, pour back into the double boiler, and continue with the method. If this doesn’t work, you’ll have to restart.)
  4. Whisk in the butter very slowly – a bit at a time. Continue to whisk vigorously for another minute or two, until thick and glossy.
  5. Remove the entire double boiler from the heat and separate the two pans while you cook the eggs (otherwise the eggs will continue to cook and will scramble). Season with salt, pepper and cayenne.
  6. You can leave for a short while, but once the water is no longer simmering hot, placing the sauce back over the water pan will keep the sauce warm and smooth while you finish up.

Method – Poached Eggs

  1. Add vinegar to a wide pan with enough water to reach a few inches up the side, and bring to a simmer.
  2. Crack each egg into a deep saucer or teacup/espresso demi-tasse, taking care not to break the yolk. One egg at a time, create a small whirlpool in the water – just large enough for one egg – and gently slide the egg into the vortex.
  3. Simmer for 3-4 minutes.

Bringing it all together

Butter your toasted muffins, top with crab cake, egg and sauce. Season with salt and pepper.

Facebooktwitterredditpinterestlinkedinmail

Toblerone Brownies

Let’s just get this out of the way – these are NOT for calorie counting days. At over 300 calories a pop, these delicious morsels are the embodiment of a ‘sometimes treat’.

With that being said, there are three different types of chocolate in here, and one of them is Toblerone. They’re rich, dense, and sweet – a small square is really all you need. On the other hand, there are three different types of chocolate in here, and one of them is Toblerone. They’re amazing. And they have the perfect crumb: they’re not especially fudgey, nor are they merely a chocolate cake with a superiority complex. They’re the perfect brownie, and my go-to recipe whenever the occasion calls for something sweet.


I adapted this recipe from the Taste.com, and after much experimenting, settled on this incarnation. The original recipe has a butterscotch-esque icing, but I found that with such a rich brownie, while the icing was delicious, it was seriously overkill. Conversely, without the icing, using all dark chocolate made them too intense (and I say that as a girl who loves her chocolate dark and bitter). But by using an even mix of dark and milk chocolate, we’re left with a well balanced slab of heaven. Words of advice:

a) splurge on good quality chocolate, you truly can taste the difference.

b) Freeze the Toblerone – it makes it SO MUCH EASIER to work with

Ingredients

250g butter, chopped

100g dark chocolate, broken into largeish pieces

100g milk chocolate, broken into largeish pieces

3/4 cup caster sugar

3 eggs

1 1/4 cups plain flour

2 tablespoons self-raising flour

200g Toblerone chocolate, frozen

Method

  1. Preheat oven to 180C. Line base and sides of an 18cm x 28cm slice pan with baking paper, extending paper 2cm above edges of pan. Spray with oil, or grease using butter (I always do the former).
  2. Place butter, dark chocolate, milk chocolate and sugar in a saucepan over low heat. Cook, stirring occasionally until melted and smooth. Remove from heat and rest for 10 minutes to cool slightly.
  3. Crack eggs, 1 at a time, into chocolate, whisking until combined. Sift in both flours, and fold to combine.
  4. Pour mixture into prepared pan. Tumble in the Toblerone pieces and very slightly press into the mixture.
  5. Bake for 25 to 30 minutes . Cool for 1 hour before lifting from pan (lest it fall apart).

Facebooktwitterredditpinterestlinkedinmail

Cream Cheese Snickerdoodles

It’s a tragic truth that here in Australia, snickerdoodles are not readily available. I don’t think I’ve ever been in a store and seen a pack, or heard anyone casually speak of them. If not for the fact that American pop culture is ubiquitous, and the name sticks in your head (or, at least, it does if you have the sense of humour of a 12 year old boy), they’d be an unknown entity to me.

I remember once, when I was first trying my hand at cooking, making some sort of snickerdoodle slice recipe that I’d seen online, and by which I been thoroughly underwhelmed. Experience tells me now that I hadn’t completely cooked the flour out of the batter, which would account for the unpleasant aftertaste, but I still remained vehemently uncurious about these funnily named little snacks. I hadn’t thought about them for years, save for the occasional time they were mentioned in an American movie or show.

The day after Mother’s Day, I found I had a glut of cream cheese left over, and no inspiration for to do with it – not even a stale bagel, nothing. So, I figured I’d do some cream cheese cookies… because what’s life without a little naughtiness, right? It wasn’t until I’d made, eaten, and thoroughly enjoyed these cookies, adapted from This Silly Girl’s Kitchen, that I realised they were, essentially, a somewhat decadent snickerdoodle. Now I get the hype, because these are the best cookies I’ve ever eaten. They’re so fluffy and cake-like, they melt in your mouth, and are sweet without being too sweet. I could eat them all day. Of course, they’re 165 calories per (not huge) cookie, so they’re a special treat, but oh, my, what a treat they are!

This recipe yields 28 cookies.

Ingredients

1/2 cup  butter, softened

125g cream cheese, softened

1 & 1/2 cup icing sugar

1 egg

1 teaspoon vanilla extract

Small pinch Maldon salt flakes

1 & 3/4 cup self raising flour

1/4 cup white sugar

1 tablespoon ground cinnamon

Method

  1. Using a stand or electric mixer, cream the butter and cream cheese until smooth. Gradually add the icing sugar until combined.
  2. Add egg, baking powder, vanilla, and salt. Mix to combine.
  3. Slowly incorporate flour, scraping the sides as needed. Refrigerate for one hour.
  4. Preheat oven to 180 degrees, and line two baking trays with non-stick baking paper.
  5. In a small bowl, mix together the cinnamon and sugar.
  6. Roll 2 teaspoons of dough into small balls, Roll each ball into the cinnamon sugar mixture to fully coat, and place on the trays about 5cm apart – they do spread a bit. Flatten slightly.
  7. Bake for 8-9 minutes, until just set. Be aware that these are a very blonde cookie, and won’t brown much, so don’t overcook. Let cool on baking sheet for 10 minutes (if, after this, they still seem undercooked, place back in hot oven for another two minutes or so). Transfer cookies to a wire rack and cool completely.
Facebooktwitterredditpinterestlinkedinmail

Crème Pâtissière

If watching shows like Masterchef has taught me anything, it’s that a) you can’t cook without a lame sob story, and b) crème pâtissière is technical and difficult.

Both of these assertions are bull. I knew the former was a load of tripe cooked up by desperate television producers, but for some reason, fell hook, line and sinker for the latter. I’ve always just avoided it, made desserts that don’t call for it. I really don’t cook decadent desserts all that regularly, and there are a slew of other options, so I’ve been able to keep my fear of the Crème pât my little secret for years.

This week, my son turned 11, and the little foodie wanted creme brûlée donuts as his birthday cake. Unwilling to disappoint my first born, and after finding a recipe from Sugar Hero that looked better than the rest, I set out to make his donuts.

The first batch – so good!

I’m still perfecting them, to be honest. The test batch were perfection. They were moist and fluffy, stuffed with silky, delicious creme patissiere, coated in a vanilla glaze, and set alight for a crunchy lid that cracked so satisfyingly, I almost yearned for a cigarette. I dutifully set one aside for my loving husband, and took the rest to my dad’s, where we shared them with some very grateful neighbourhood kids. When I got home, the dog had eaten the husband’s. Hubby was less than amused, but Mac seemed very pleased with his ill-gotten treat.

The second batch failed, epically. Burned on the outside, and raw in the middle. Like, so raw, it looked like I’d already filled them with the custard. Of course, this failed batch was the one that actually counted because I made them on his birthday, which happened to fall on a public holiday, so my emergency back up options were extremely limited. Thankfully, Krispy Kreme was open, and the boy was hardly disappointed in being taken there to go nuts. He was thrilled with this contingency, but I was still so, so disappointed. I think I know what I did wrong, and will try again. But, honestly, I’ll probably keep playing around with donut recipes, while keeping the Sugar Hero one handy, because it really was very good.

What I won’t be looking for, however, is another Crème pâtissière recipe. Sugar Hero NAILED it. It was thick, silky, sweet but not tooth-achingly so, vanilla-y and the right level of eggy. It can also be made ahead of time, which is what I had done with the second batch of donuts. I now had a serving of the custard, and no donuts to squirt them into. As it was Easter weekend, and I had another party to attend the next day, I whipped up a Birthday Custard Sponge from Nigella Lawson, and sandwiched it with the Crème pât. It. Was. Heaven.

This particular recipes yields a fair amount of crème pâtissière, but I truly don’t see that being a problem – it’s very versatile. And delicious by itself. If you find you have any left over from whatever you use it for, a spoon is all you’ll need to rectify that little problem. I’m also looking forward to making a traditional crème brûlée with it.

I’m not even bothering to look up the calories for this one. It’s too variable – how much of it you eat really depends on what you do with it. Chances are, though, if you’re having a crème pât kind of dessert, you don’t really want to know, anyway.

Ingredients

4 yolks

1 whole egg

3 tbsp cornstarch

1/2 cup granulated sugar

2 cups milk

pinch salt

2 tsp vanilla bean paste or 1 tbsp vanilla extract

2 tbsp butter

Method

  1. In a bowl, whisk together the yolks, egg, cornstarch, and 1/4 cup of the sugar, until thick.
  2. In a saucepan, combine the milk, remaining sugar, and salt. Heat the milk over a medium burner until it just starts to boil. Check consistently – if it burns or scalds, you’ll need to start again.
  3. Whisk the egg mixture, slowly drizzling a little hot milk into the bowl as you do. Continue to whisk and drizzle until you’ve added about half of the milk. Keeping the saucepan off the heat, pour the eggs into the milk mixture while whisking continuously.
  4. Return the saucepan to the stove over medium-low heat, whisking constantly. Use a rubber spatula to periodically scrape the bottom of the pan so it doesn’t scorch . Cook until the pastry cream thickens and starts a very gently bubbling, then cook for 1-2 minutes longer. Remove the pan from the heat and whisk in the vanilla bean paste or extract, and butter.
  5. Pour the cream through a wire mesh strainer into a bowl. Use a spatula to help work it through, straining out any clumps of egg that have developed. Press a layer of cling wrap directly on top of the pastry cream to prevent a skin, and let it cool to room temperature. Once at room temperature, refrigerate it until it’s cold, at least 2 hours. This will last 2 days in the fridge.

Facebooktwitterredditpinterestlinkedinmail

Mocha Macarons (Mocharons?)

I’ve long had a love-hate relationship with macarons since the Zumbo craze a few years back- they’re delicious, of course, but they’re also expensive and just a tad pretentious for what they are. And I was convinced that they’d be hard to make, even though I do know my way around meringue and baking in general. I wrote them off as something I’d never bother to make years ago.

For my later, I received a gift certificate from my mother in law to the Paris International Cooking School (sadly, in Sydney, not Paris, but it was still an awesome gift!), and walked out of there a few weeks later with a bunch of recipes, a full belly, and, inexplicably, a bottle of gourmet coffee flavoured syrup I’d purchased on a whim. Predictably, that syrup sat in the dark recesses of my baking cupboard for a month or so, until today, when another impulse purchase took me by surprise – a 2kg bag of almond meal.

You can see where this is going.

With all these ridiculous ingredients, guests on their way, and a healthy fear of what was to come, I had to work out the most fool-proof option for making these macarons. Thank goodness for Elaine and her recipe at The Spruce Eats,

as not only did she provide a really simple and effective base recipe that I could change up a bit, but she also talks the reader off the ledge every step of the way.

All I did differently here was add a teaspoon of cocoa to the macaron mixture, and a dash of coffee syrup to the filling. And it was perfect. Chewy, light, barely sweet, and a breeze to cook for only 110 calories a pop (if you make 12). I did, however, find that I had to keep them in the oven longer, but ovens are notoriously fickle, so I took that with a big old grain of salt.

Ingredients

3/4 cup icing sugar

3/4 cup almond meal

2  egg whites

Small pinch maldon salt flakes

1/4 cup caster sugar

1tsp cocoa

Filling:

2/3 cup butter, softened

2/3 cup icing sugar

2tsp coffee syrup

Method

Preheat the oven to 140 C. Line two baking trays with baking paper, and draw 12 circles on each of them, using a shot glass as a stencil.

Sieve the icing sugar and ground almonds into a large mixing bowl, ensuring there are no lumps – I like to whisk the end result, just to be sure.

In a separate clean bowl (I used my stand mixer here), whisk the egg whites and salt until they form soft peaks. Add the caster sugar little by little, whisking until the whites are glossy and stiff peaks form.

Gently fold in the almond mixture. Don’t worry that the meringue loses air, this is normal.

Fill a piping bag with the mixture. Don’t use the star nozzle like I did at first – you want a round, flat base here. Pipe the mixture onto the rounds, filling in the circle.

Gently bang the baking trays on the bench to release any air pockets. Leave on bench to dry out for 20 minutes.

Bake the macarons for 15 minutes, opening the door halfway through to allow any steam (and hence moisture) to escape. Remove from the oven, and allow to sit in their trays until cool. They might seem a little underdone, but will firm upon cooling.

To make the filling, cream the butter and gradually beat in the icing sugar. Add flavouring and beat a little more. Spread 1/2 tsp of filling onto the flat side of one macaron, sandwich with another, and gently twist to cement them together. Repeat with remaining cookies.


 Facebooktwitterredditpinterestlinkedinmail

Strawberry Cheesecake Muffins

While I do take a healthy diet and lifestyle very, very seriously, I’ve long said that the secret to my success is that I haven’t cut anything out, I’ve just cut it down.  Sugar, fat, carbs, white food, alcohol, bagels, cake – you name it, I’ve almost certainly eaten it since starting  my fitness journey nearly 18 months ago. It’s all about balance, and making sensible choices in terms of portion size and what else you eat that day. Conscious, mindful eating. That’s my boring trick.

Today, I was expecting anywhere between 1 and 12 people in my house today, with no idea what time anyone would be over. I wanted something delicious, fun to make, and flexible to cook/store, that my kids and I could bake in the middle of a heatwave. These muffins were just the ticket. Part muffin, part cheesecake, and 100% delicious, we had as much fun making them as we did eating them. And when only 2 people ended up dropping by, I simply froze the extra (non-frosted) cakes, so we now have emergency cake. PLEASE tell me I’m not the only person who feels far more comfortable in life knowing that there is emergency cake stashed in the freezer!

This recipe is very closely adpated from Taste.com.au, however, by making 20 smaller muffins instead of 12 jumbos, I cut the calories to a much more palatable 297 calories, proving once again that you can have your cake and eat it too!  They’re pretty sweet – I don’t think I could have eaten a jumbo muffin anyway – these the perfect treat size. For me, any way.It’d make a perfectly respectable whole cake, too, provided you used a rather large tin – with four eggs in there, the rise is considerable. I’d hazard a guess that the cream is pretty optional in the icing, and will skip it next time (and there will be a next time!), although it wasn’t ruining anything by being there.

Makes 20

Ingredients

muffins:

125g butter

1.5 cups caster sugar

250g cream cheese

1tsp vanilla

4 eggs

250g strawberries, diced

cheesecake frosting

150g cream cheese

1/2 cup thickened cream

3/4 icing sugar (the original recipe calls for 1/3, but I found it was too runny and tasted far too much of cream)

1/2 tsp vanilla

10 strawberries, hulled and halved


Method

  1. Preheat oven to 180°C and line muffin tins with patty pans.
  2. Beat cream cheese and butter until combined. Add sugar and beat until pale and creamy.
  3. Add eggs one at a time, and beat after each egg until fully incorporated.
  4. Add vanilla and mix.
  5. Add flour and gently combine. Fold through strawberries.
  6. Spoon mixture into cases until 2/3 full. Bake for 20 minutes.
  7. When cooked, remove pans from oven and allow cakes to cool for 10 minutes in the pans. Transfer to rack to cool completely.
  8. While muffins are baking,  combine all icing ingredients and beat thoroughly until thick and fully incorporated. Rest in fridge until ready to use.
  9. When muffins are cool, pipe or spread the icing over the muffin and top with a slice of strawberry. (my kids ate the strawberries on me while I was still using them – any other berry works just as well!)

 Facebooktwitterredditpinterestlinkedinmail